Adventure-Creator-3Dtutorial-Part6
Inventory Items
进入Inventory manager,点击Create new item,Name命名为Instruction manual,将TutorialFiles——EvilLair——Set——Textures——BookIcon放到Main graphic里面
为了能够让物品栏中的物品可以与鼠标产生交互,还需要一些多余的设置,首先进入Menu manager,点击进入Inventory properties,取消勾选Ignore input
然后在Assets文件夹当中选择Adventure Creator——Downloads——UI——WD_InventoryUI,在Inspector面板中的Canvas Group组件里勾选Interactable和Blocks Raycasts。因为这是基于Unity prefab的UI,所以有后面这一步。如果使用Adventure Creator作为Source的话直接取消勾选ignore input就可以了
点击Inventory manager,选择Instruction manual,编辑Standard Interaction,首先点击Create生成一个USE的interaction,将其生成的文件放进My 3D Game——ActionLists里,然后将这个interaction拉取进Examine中共用
双击Instructionmanual:Use 编辑
将TutorialFiles——EvilLair——Set——Instructionmanual放到场景中的桌子上

我们先将场景中的咖啡桌制作一个Hotspot,这个Hotspot直接使用添加组件的方式制作
首先在hierarchy窗口选中Logic——Hotspots,然后右键——空对象——命名为Hotspot_Coffee table。然后向其中添加Hotspot组件,将其中的Label输入“咖啡桌”
然后添加一个Capsule Collider,打开is trigger,半径设置为1.18,并将其移动到 X:-13.3、Y:1.25、Z:15.156 的位置(这个位置是这个Hotspot的Transform的位置,不是这个Collider单独的位置)。然后新建一个Walk to Marker,将其移动到 X:-13.275、Y:0.5、Z:13.148 的位置。
点击进入SetGeometry——EvilLair——Coffee Table,添加Highlight组件,然后在Hotspot_Coffee table 中指定它为Highlight,然后点击添加USE interactions,Player action——Walk to marker,Face after moving-true,Create interaction-咖啡桌:USE
在Scene manager里面新建一个GameCamera,命名为TableCam,并将其放在咖啡桌旁边,位置如下
| Position | -12.15 | 2.23 | 13.41 |
|---|---|---|---|
| Rotation | 14.434 | -42.113 | -0.317 |
然后在Game Camera脚本里面,打开Follow cursor
编辑Coffee Table:USE的interaction,我们先进入Hotspot Panel:USE的interaction,复制它的节点,然后回到Coffee Table:USE的interaction粘贴,我们把Camera Switch设为TableCam,把Hotspot disable设为Hotspot:Coffee Table。
在hierarchy床口中的InstructionManual被选中的情况下,我们进入menu manager,点击一下Hotspot,然后在上方的Scene Prefabs里面勾选Position over selected mesh,输入名称Hotspot_Manual,点击新建即可。这个HotSpot比咖啡桌的Hotspot小,所以会像之前Panel内部的button一样被隐藏
在Hotspot_Manual内部添加一个Highlight组件给自己。Label输入“手册”,新建USE interaction——Cursor/icon-Use——创建Interaction。
Ctrl+D复制一个TabelCam,然后更改一下如下表所示的位置,命名为ManualCam
| Position | -12.318 | 1.893 | 15.273 |
|---|---|---|---|
| Rotation | -0.149 | -149.56 | -2.377 |
点击EL_TinPot——rRobot——WheelPosition——Leg——Chest——Arm.L——Forearm.L——Hand.L——Hold.L,进入EL_TinPot的Inspector,将Hold.L放进Left hand里面。Override一下Prefab
准备好这些之后,我们开始编辑Interaction——Hotspot_Manual:Use
ActionList parameters
在场景中,我们有两个CloseUp类的ActionList,一个是CloseUp_Panel,一个是CloseUp_Coffee table,这两个的流程都是切换摄像机——锁定Player——关闭Hotspot——激活Menu。实际游戏场景中,我们可能有非常多的相似的ActionList,都是同一套流程,为了化繁为简,我们可以将这个流程的ActionList放在Assets里面,跟随需要进行实例化,并配合ActionList parameters,也就是再造一个轮子。
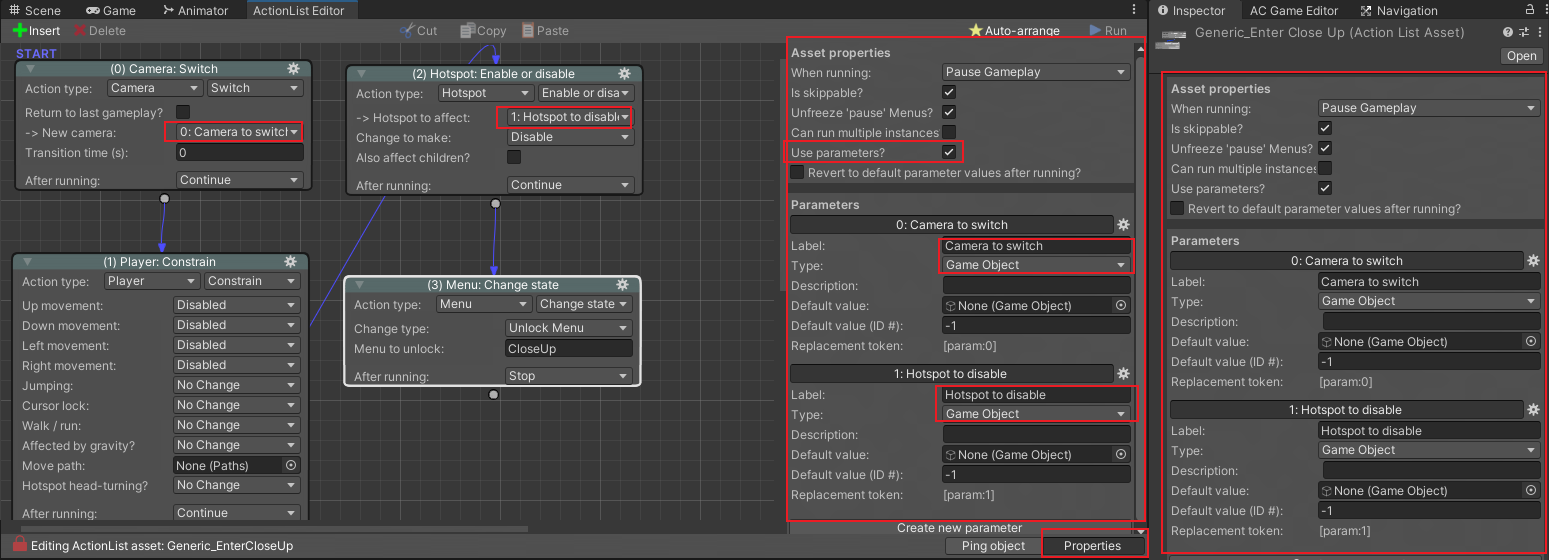
首先点击Hotspot_Panel:Use,在Inspector窗口中,点击Interaction Script右侧的菜单按钮,在弹出的窗口中选择Convert to ActionList asset,弹出窗口点确定,然后将生成的文件放到My 3D Game——ActionLists文件夹当中,将其重新命名为Generic_EnterCloseUp.
双击打开Generic_EnterCloseUp,在ActionList编辑窗口中点击右下角的Properties,在画面右侧就会出现Asset properties窗口,勾选Use parameters,点击Create new parameter两次,Label分别是Camera to Switch和Hotspot to disable,Type 都是gameobject。
这时候改变一下Camera:Switch节点和Hotspot:Enable or disable节点,让他们引用parameter,而不是场景中的对象
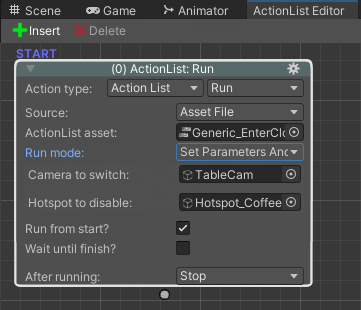
点击hierarchy中的Hotspot_Panel:Use,在inspector窗口中将Actions source改为In scene,然后删掉里面的节点,更换为
- ActionList:Run——Source-Asset File——ActionList asset-Generic_EnterCloseUp——Run mode-Set Parameter And Run——Camera to Switch-PanelCam——Hotspot to disable-Hotspot_Panel
相似地,我们需要把咖啡桌:USE这个interaction也修改了
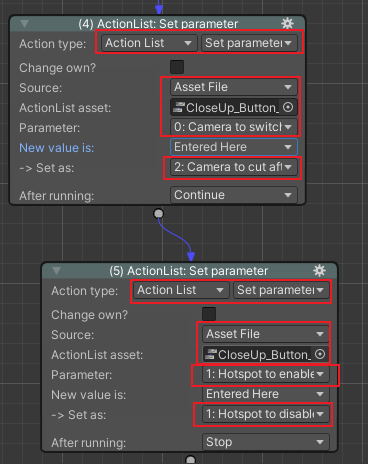
因为每次我们点击退出CloseUp的Exit按钮时,先前的摄像机都不一样,所以我们也需要把 CloseUp_Button_CloseUp_OnClick这个ActionList设定参数
这里和上面的过程相似,因为这个actionlist是在文件夹里面的,所以直接生成两个parameter,一个是Camera to Switch,一个是Hotspot to enable,然后更改相应的节点。
然后再双击打开Generic_EnterCloseUp,首先新建一个parameter,命名为Camera to cut after,type依然是GameObject,然后新建两个节点如下图所示
然后回到Hotspot Panel:USE这个interaction,把NavCam1拉进Camera to cut after,回到Coffee table:USE这个Interaction,把NavCam Platform拉进去
重新命名CloseUp_Button_CloseUp_OnClick为Generic_ExitCloseUp.
Inventory Actions
我们接下来要做整个解谜最后的部分。让主角机器人用拿到的InstructionManual拍击Panel,来让LaserGun关闭
首先我们要把主角拿InstructionManual和放下InstructionManual的动作做成一个Cutscene。因为这个动作总是重复调用,这样做更加方便
在scene manager里面新建Cutscene,命名为Manual_Hold,打开它的actonlist
- Object :Visibility——Object to affect-InstructionManual——Visibility-Visible
- Character:Hold object——Is Player-true——Object to hold——InstructionManual
Ctrl+D复制这个Cutscene,命名为Manual_Hide,编辑actionlist
- Object :Visibility——Object to affect-InstructionManual——Visibility-Invisible
- Object:Set parent——Object to affect-InstructionManual——Method-Clear Parent
点击进入Hotspot_Manual:Use的Interaction,删掉Character:Hold Object节点,直接在上方的Camera:Switch后的After running选择Run cutscene-Manual_Hold
然后再删掉Object:Visibility节点,在此节点链最后的Camera:Switch中,After running选择Run cutscene-Manual_Hide
点击Hotspot_Buttons,在inspector窗口中点击新建Inventory Interactions,点击Create interaction
在编辑这个interaction之前,先打开Variables manager,新建一个Global variable,Label中命名为Turned Laser off
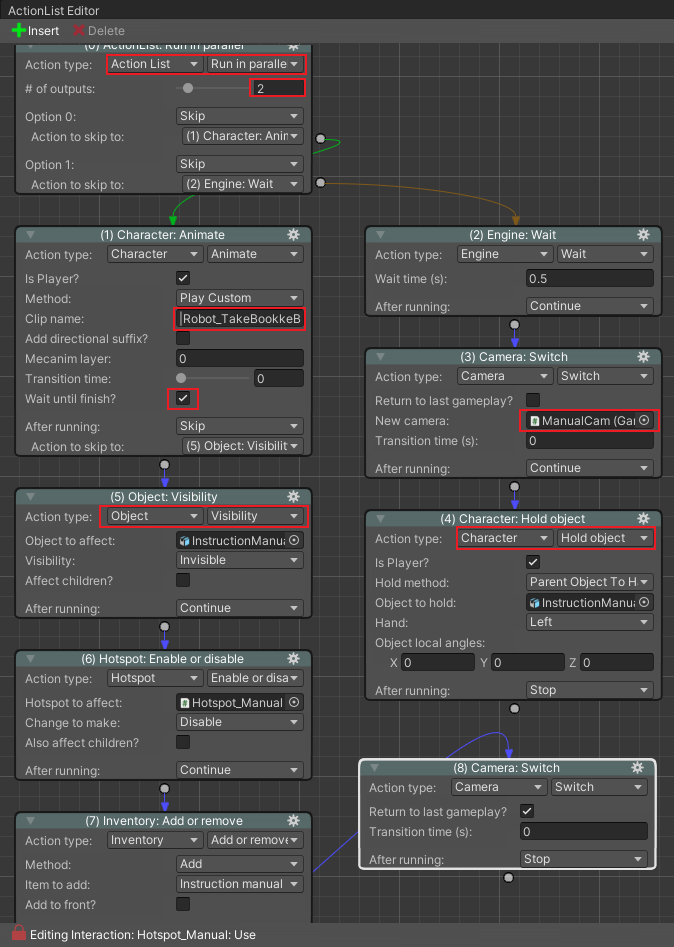
编辑 按钮:Instruction manual
- ActionList:Run——ActionList-Manual_Hold
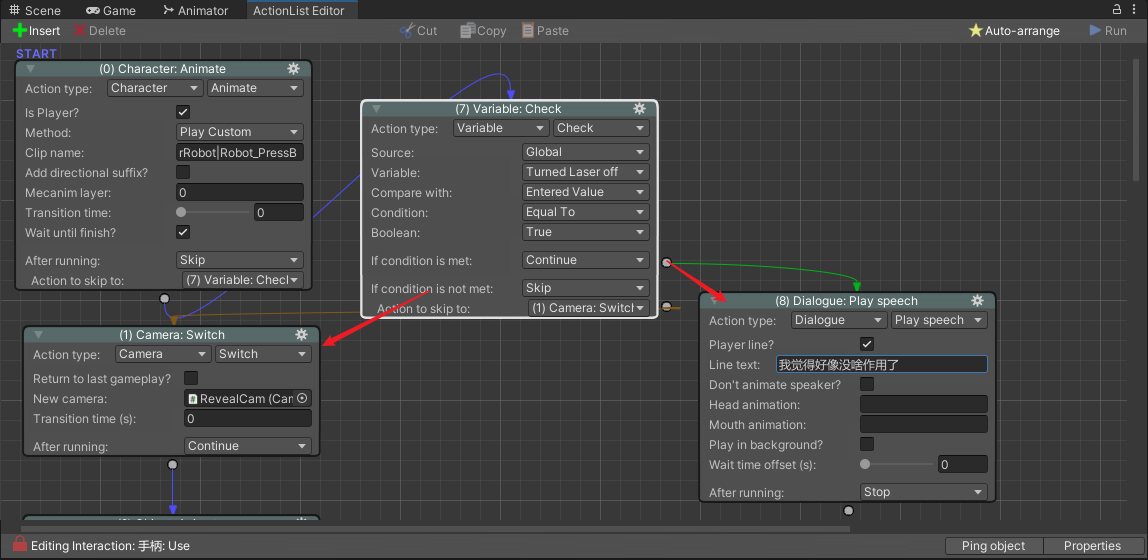
- Character:Animate——Is Player-true——Method:Play Custom——Clip name-rRobot|Robot_SlamPanel——Wait until finish-true
- Camera:Switch——New camera-RevealCam
- Object:Animate——Animation engine-Mecanim——Animator-LaserGun——Parameter to affect-State——Parameter type-Int——Set as value-3
- Engine:Wait——Wait time-2
- Camera:Switch——New camera-TalkCam
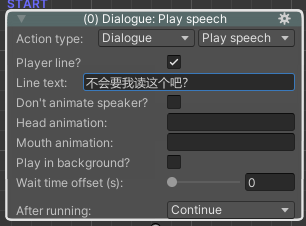
- Dialogue:Playspeech——Speaker-EL Brain——Line text-哦……终于停下来了
- Variable:Set——Statement-true
- Camera:Switch——Return to last gameplay-true
- Hotspot:Change interaction——Hotspot to change-Hotspot_Buttons——Interaction to change-Inventory——Change to make-Disable——After running-run cutscene——Cutscene to run-Manual_Hide
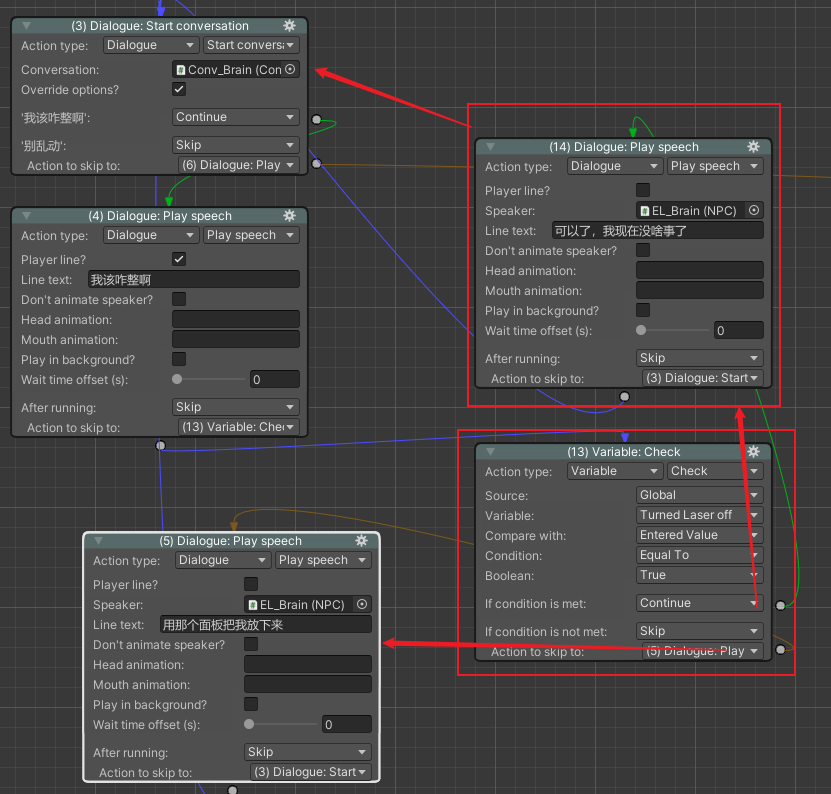
编辑——手柄:USE
编辑——Brain:Talk to
Saving
打开File——Build Settings,然后将当前场景放进Build里面
然后打开Settings manager,点击Auto add Save components to gameObjects