事件系统 操作事件是非常庞大的。鼠标、键盘和手势能产生很多事件。
不同的UI操作事件不太一样,例如按钮,单击事件、按下事件和抬起事件都各不相同。
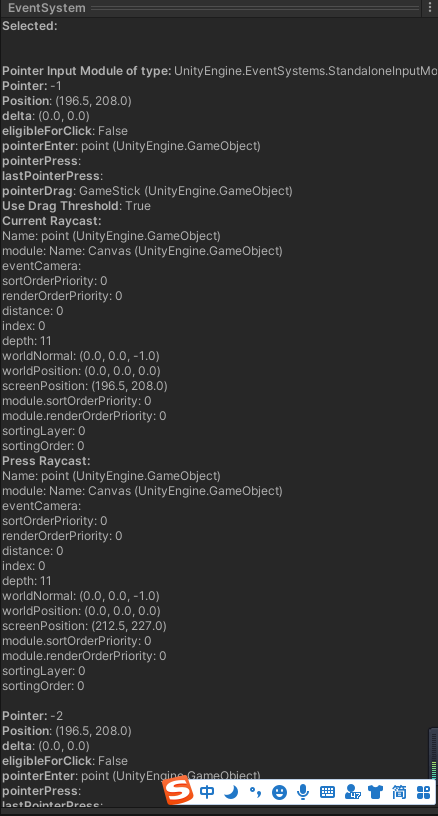
unity添加任意一个UI组件后,都会自动添加一个全局EventSystem对象,运行起来后,在面板中可以查看操作的详细信息。
事件系统不仅会抛出点击一类的事件,还可以取到最基本的操作信息。例如鼠标在屏幕中的坐标,滑动开始的坐标以及滑动结束的坐标等。
新版的EventSystem不仅供UI使用,3D游戏对象也可以使用它 ,并且使用方法都比较接近。
UI事件 UI事件依赖于Graphic Raycaster组件,它必须绑定在Canvas组件上,表示这个Canvas下所有UI元素支持的事件。
游戏中同时有很多Canvas,如果想让游戏中某些UI不可接收点击事件,可以考虑把部分Canvas的Graphic Raycaster设置enable = false,或者直接删掉Graphic Raycaster。
Button、Toggle、Slider等都是属于Unity预先封装好的带UI元素事件的组件,但是一些基础的组件Image、Text等是没有事件封装的,可以手动添加监听方法。
IpointerEnterHandler - OnPointerEnter: 指针进入该区域时调用IpointerExitHandler - OnPointerExit:指针离开该区域调用IpointerDownHandler - OnPointerDown:按下时调用IpointerUpHandler - OnPointerUp:抬起时调用IpointerClickHandler - OnPointerClick:按下并抬起时调用InitializePotentialDragHandler - OnInitializePotentialDrag:拖动初始化IBeginDragHandler - OnBeginDrag:拖动开始时调用,并且可以取到拖动的方向,而OnInitializePotentialDrag只表示滑动初始化,无法取到方向IDragHandler - OnDrag: 滑动持续时调用IEndDragHandler - OnEndDrag:滑动结束时调用IDropHandler - OnDrop:落下时调用IScrollHandler - OnScroll:鼠标滚轮持续时调用IUpdateSelectedHandler - OnUpdateSelected:选择时持续调用,只针对Selectable起作用。ISelectHandler - OnSelect:选择后调用,只针对Selectable起作用IDeselectHandler - OnDeselect:取消选择时调用,如果是一个group的Selectable组件并且是互相冲突的,选择新的后,之前选择的会回调此方法。IMoveHandler - OnMove:监听输入系统的Horizontal和Vertical对应的输入事件,比如WASD和方向键,如果访问eventData.moveDir,可以取到具体移动方向ISubmitHandler - OnSubmit:按钮按下事件。ICancelHandler - OnCancel:按钮取消事件,按下时按ESC键可取消
根据自己的需求,需要多少接口,就依次实现这些接口。
举例:监听Image或Text的点击事件。
因为每一个UI组件是GameObject,所以脚本只要继承MonoBehaviour和需要的接口,挂载在需要的UI组件上就可以了
1
2
3
4
5
6
7
8
9
10
11
12
13
using UnityEngine;using UnityEngine.UI;using UnityEngine.EventSystems;public class ImageClickable : MonoBehaviour , IPointerClickHandler { #region IPointerClickHandler implementation public void OnPointerClick (PointerEventData eventData ) { Debug.LogFormat("{0} is click" , gameObject.name); } #endregion }
UI事件管理 UI中需要响应的事件太多了,每一个UI都挂脚本是很麻烦的,所以每一个UI界面都应该有一个类来统一处理事件。
使用下面的脚本,使用OnClick方法统一处理按钮、文本和图片元素的点击事件。在同一位置给所有UI组件添加监听,调用UGUIEventListener.Get()方法传入需要作为listener的对象、文本或者图片
1
2
3
4
5
6
7
8
9
10
11
12
13
14
15
16
17
18
19
20
21
22
23
24
25
26
27
using UnityEngine;using UnityEngine.UI;using UnityEngine.EventSystems;public class UIUniteManager : MonoBehaviour { public Button button1; public Button button2; public Text text; public Image image; private void Awake () { button1.onClick.AddListener(()=> { OnClick(button1.gameObject); }); button2.onClick.AddListener(()=> { OnClick(button2.gameObject); }); UGUIEventListener.Get(text.gameObject).onClick = OnClick; UGUIEventListener.Get(image.gameObject).onClick = OnClick; } void OnClick (GameObject go ) { if (go == button1.gameObject) { Debug.Log("点击按钮1" ); } else if (go == button2.gameObject) { Debug.Log("点击按钮2" ); } else if (go == text.gameObject) { Debug.Log("点击文本框" ); } else if (go == image.gameObject) { Debug.Log("点击图片" ); } } }
按钮点击之后,每一个按钮背后需要处理的事件其实是很多的,我们需要在控制层(C)接受事件,再将事件传递给模块层(M),等模块层处理完毕后再通知UI刷新显示层(V),这就是经典的MVC 的UI设计思路。
UGUI并没有对文本和图片元素提供点击事件,不过我们可以继承EventSystems.EventTrigger来实现OnPointerClick()方法。当然,还可以实现拖动、按下、抬起等一些事件。
EventTrigger是继承自MonoBehavior的,并且继承了很多Event接口Class EventTrigger | Unity UI | 1.0.0 (unity3d.com)
1
2
3
4
5
6
7
8
9
10
11
12
13
14
15
16
17
18
19
20
21
22
23
24
25
26
27
28
29
30
using System.Collections;using System.Collections.Generic;using UnityEngine;using UnityEngine.Events;public class UGUIEventListener : UnityEngine.EventSystems.EventTrigger { public UnityAction<GameObject> onClick; public override void OnPointerClick (UnityEngine.EventSystems.PointerEventData eventData ) { base .OnPointerClick(eventData); if (onClick != null ) { onClick(gameObject); } } static public UGUIEventListener Get (GameObject go ) { UGUIEventListener listener = go.GetComponent<UGUIEventListener>(); if (listener == null ) listener = go.AddComponent<UGUIEventListener>(); return listener; } }
UnityAction和UnityEvent UnityAction是Unity自己实现的事件传递系统,就像C#里的委托和事件一样,它属于函数指针,可以把方法传递到另外一个类中去执行。
而UnityEvent负责管理UnityAction,它提供了AddListener、RemoveListener和RemoveAllListeners。
UnityAction只能调用自己,但是UnityEvent可以同时调用多个UnityAction,而且UnityEvent还提供编辑器Inspector上的赋值操作。
使用事件是非常好的做法,它可以大量减少代码中的耦合,避免类与类之间互相调用,也避免后期修改带来的维护成本。
例如,游戏中的网络请求、发送请求和处理请求的结果希望在同一个类中处理,那么就可以把处理函数用函数指针传入网络模块,等网络消息处理结束后, 再执行当初传入的函数指针。因为发送消息和处理消息完全不依赖网络模块,所以未来就算将发送和处理消息的代码删掉,网络模块的代码也不会受到影响。
如果事件需要带参数,就得继承UnityEvent并且声明参数的数量以及数据类型。
1
2
3
4
5
6
7
8
9
10
11
12
13
14
15
16
17
18
19
20
21
22
23
24
25
26
27
28
29
30
31
32
33
34
35
36
37
38
39
40
41
42
43
44
45
46
47
48
49
50
using UnityEngine;using UnityEngine.UI;using UnityEngine.Events;public class MyEvent : UnityEvent <int ,string >{ }public class MyCustomEvent : MonoBehaviour { public UnityAction<int ,string > action1; public UnityAction<int ,string > action2; public MyEvent myEvent = new MyEvent(); public void RunMyEvent1 (int a,string b { Debug.Log(string .Format("RunMyEvent1,{0},{1}" ,a,b)); } public void RunMyEvent2 (int a, string b { Debug.Log(string .Format("RunMyEvent2,{0},{1}" , a, b)); } private void Start () { action1 = RunMyEvent1; action2 = RunMyEvent2; myEvent.AddListener(action1); myEvent.AddListener(action2); myEvent.AddListener((n,m)=> { n = 1 ;m = "88" ; RunMyEvent2(n, m); }); } private void Update () { if (Input.GetKeyDown(KeyCode.A)) { action1.Invoke(0 , "a" ); action2(1 , "b" ); } if (Input.GetKeyDown(KeyCode.B)) { myEvent.Invoke(100 , "a & b" ); } } }
UnityAction可添加泛型带参数,但是UnityEvent如果要带参数,需要再写个继承类
RaycastTarget优化 UGUI的点击事件基于射线,如果不需要响应事件,不要在Image和Text组件上勾选RaycastTarget。
UI事件会在EventSystem的Update方法中调用Process时触发。UGUI会遍历屏幕中所有RaycastTarget是true的UI,然后再发射射线,并且排序找到玩家最先触发的那个UI,再抛出事件给逻辑层去响应。这样无形中就会带来很多开销。
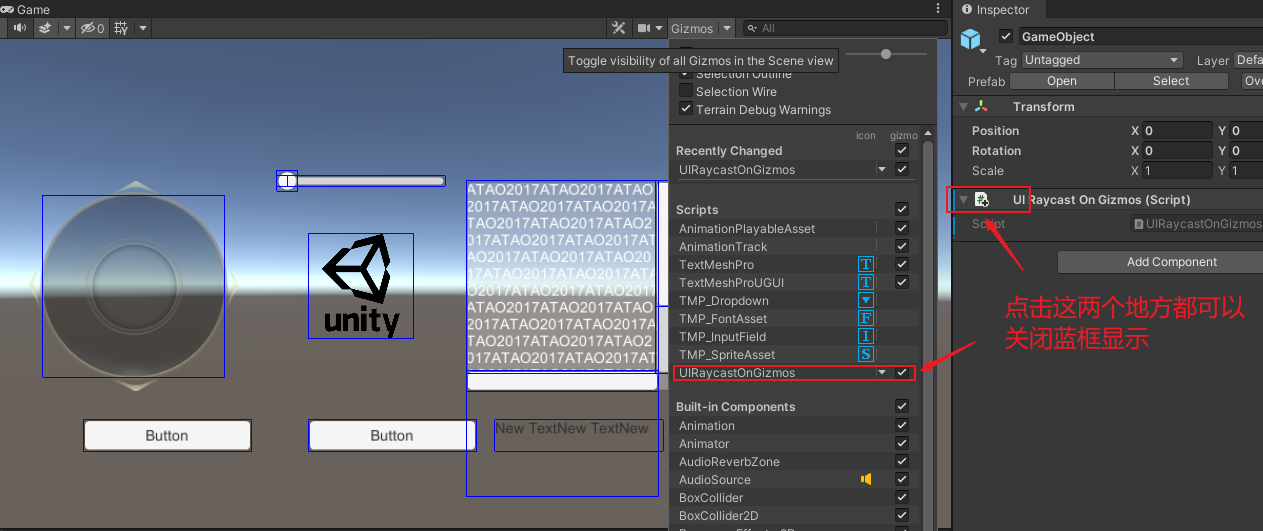
我们拓展Scene视图,将所有勾选过RaycastTarget的UI用线框的方式显示出来,这样就可以及时把不需要响应点击事件的UI全部取消勾选
1
2
3
4
5
6
7
8
9
10
11
12
13
14
15
16
17
18
19
20
21
22
23
24
25
26
using UnityEngine;using UnityEngine.UI;public class UIRaycastOnGizmos : MonoBehaviour { #if UNITY_EDITOR static Vector3[] fourCorners = new Vector3[4 ]; void OnDrawGizmos () { foreach (var g in GameObject.FindObjectsOfType<MaskableGraphic>()) { if (g.raycastTarget) { RectTransform rectTransform = g.transform as RectTransform; rectTransform.GetWorldCorners(fourCorners); Gizmos.color = Color.blue; for (int i = 0 ; i < 4 ; i++) { Gizmos.DrawLine(fourCorners[i], fourCorners[(i + 1 ) % 4 ]); } } } } #endif }
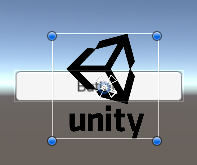
渗透UI事件 如图,一个图像在一个Button的上方。如果想要点击Image的时候需要Button也响应点击,就将下面的脚本挂载在Image组件上
在PassEvent方法中,取到eventData,使用EventSystem.current.RaycastAll()方法找到所有能传递当前eventData事件的对象,最终使用ExecuteEvents.Execute()方法将事件传递给需要的对象
新建InfiltrateUIEvents脚本
1
2
3
4
5
6
7
8
9
10
11
12
13
14
15
16
17
18
19
20
21
22
23
24
25
26
27
28
29
30
31
32
33
34
35
36
37
38
39
using System.Collections.Generic;using UnityEngine;using UnityEngine.EventSystems;public class InfiltrateUIEvents : MonoBehaviour ,IPointerClickHandler ,IPointerDownHandler ,IPointerUpHandler { public void OnPointerClick (PointerEventData eventData ) { PassEvent(eventData, ExecuteEvents.pointerClickHandler); } public void OnPointerDown (PointerEventData eventData ) { PassEvent(eventData, ExecuteEvents.pointerDownHandler); } public void OnPointerUp (PointerEventData eventData ) { PassEvent(eventData, ExecuteEvents.pointerUpHandler); } public void PassEvent <T >(PointerEventData data,ExecuteEvents.EventFunction<T> function ) where T :IEventSystemHandler { List<RaycastResult> results = new List<RaycastResult>(); EventSystem.current.RaycastAll(data, results); GameObject current = data.pointerCurrentRaycast.gameObject; for (int i = 0 ; i < results.Count; i++) { if (current != results[i].gameObject) { ExecuteEvents.Execute(results[i].gameObject, data, function); } } } }
例子——新手引导聚合动画 新手引导的事件最好与业务逻辑分开,不然就需要在每个界面再写一遍新手引导的事件,最好的方法就是引导的UI在最前面再做一个全屏透明层以挡住所有的事件。当事件点在这层UI上并且将事件渗透下来的同时,处理点击背后的逻辑。
在Canvas内部,新建一个Panel。
新建BeginnerGuideScript脚本,通过这个脚本计算出需要点击区域的中心的位置,并且传入Shader中。声明Slider属性来控制圆形遮罩的区域,最终在Update方法中动态修改它,形成一个shader动画效果。使用Mathf.SmoothDamp来让动画更加自然
1
2
3
4
5
6
7
8
9
10
11
12
13
14
15
16
17
18
19
20
21
22
23
24
25
26
27
28
29
30
31
32
33
34
35
36
37
38
39
40
41
42
43
44
45
46
47
48
49
50
51
52
53
54
55
56
57
58
59
60
61
62
63
public class BeginnerGuideScript : MonoBehaviour { public Image target; public Canvas canvas; private Vector4 m_Center; private Material m_Material; private float m_Diameter; private float m_Current = 0f ; Vector3[] corners = new Vector3[4 ]; private void Awake () { target.rectTransform.GetWorldCorners(corners); m_Diameter = Vector2.Distance(WorldToCanvasPos(canvas, corners[0 ]), WorldToCanvasPos(canvas, corners[2 ])) / 2f ; float x = corners[0 ].x + ((corners[3 ].x - corners[0 ].x) / 2f ); float y = corners[0 ].y + ((corners[1 ].y - corners[0 ].y) / 2f ); Vector3 center = new Vector3(x, y, 0f ); Debug.LogFormat("center of world:{0}" , center); Vector2 position = Vector2.zero; RectTransformUtility.ScreenPointToLocalPointInRectangle(canvas.transform as RectTransform, center, canvas.GetComponent<Camera>(), out position); center = new Vector4(position.x, position.y, 0f , 0f ); Debug.LogFormat("center of local:{0}" , center); m_Material = GetComponent<Image>().material; m_Material.SetVector("_Center" , center); (canvas.transform as RectTransform).GetWorldCorners(corners); for (int i = 0 ; i < corners.Length; i++) { m_Current = Mathf.Max(Vector3.Distance(WorldToCanvasPos(canvas, corners[i]), center), m_Current); } m_Material.SetFloat("_Slider" , m_Current); } float yVelocity = 0f ; private void Update () { float value = Mathf.SmoothDamp(m_Current, m_Diameter, ref yVelocity, 0.3f ); if (!Mathf.Approximately(value , m_Current)) { m_Current = value ; m_Material.SetFloat("_Slider" , m_Current); } } private void OnGUI () { if (GUILayout.Button("test" )) { Awake(); } } Vector2 WorldToCanvasPos (Canvas canvas,Vector3 world ) { Vector2 position = Vector2.zero; RectTransformUtility.ScreenPointToLocalPointInRectangle(canvas.transform as RectTransform, world, canvas.GetComponent<Camera>(), out position); return position; } }
将这个脚本挂载在Panel上,然后将需要聚焦的图片个整个Canvas拉取进来
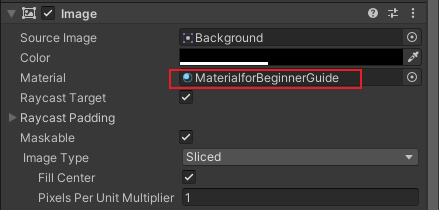
我们在Project窗口里面,找一个合适的文件夹,新建一个material,并把Panel内部的Image组件挂载这个Material
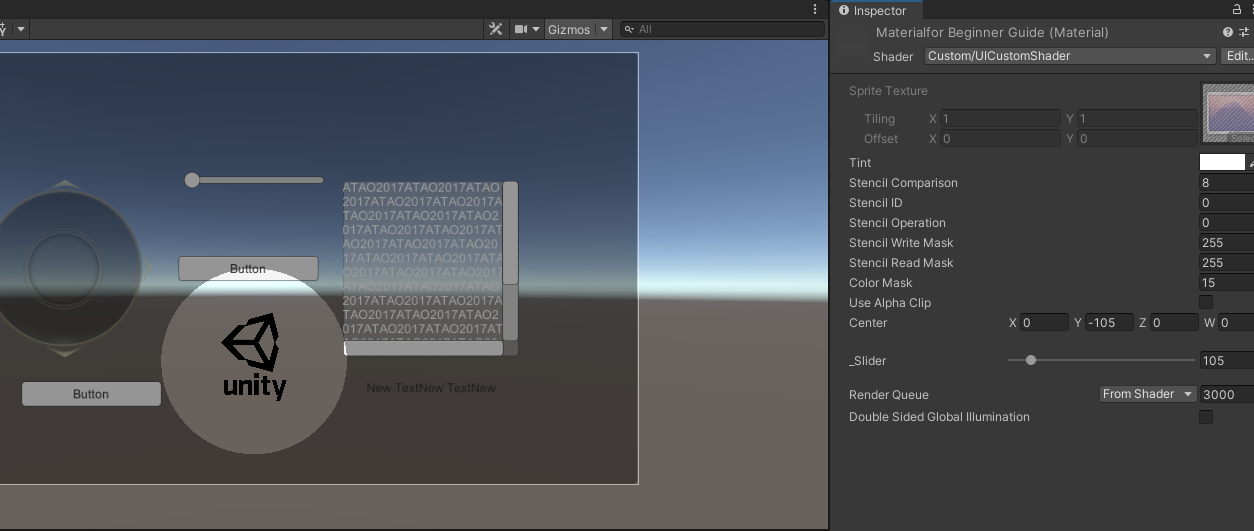
然后在Project窗口里面,找一个合适的文件夹,新建一个Standard Surface Shader,命名为UICustomShader,然后将下面的shader代码完全覆盖掉默认的
1
2
3
4
5
6
7
8
9
10
11
12
13
14
15
16
17
18
19
20
21
22
23
24
25
26
27
28
29
30
31
32
33
34
35
36
37
38
39
40
41
42
43
44
45
46
47
48
49
50
51
52
53
54
55
56
57
58
59
60
61
62
63
64
65
66
67
68
69
70
71
72
73
74
75
76
77
78
79
80
81
82
83
84
85
86
87
88
89
90
91
92
93
94
95
96
97
98
99
100
101
102
103
104
105
106
107
108
109
110
111
112
113
114
115
116
117
118
119
120
121
122
123
124
125
126
127
Shader "Custom/UICustomShader" { Properties { [PerRendererData] _MainTex("Sprite Texture", 2 D) = "white" {} _Color("Tint", Color) = (1 ,1 ,1 ,1 ) _StencilComp("Stencil Comparison", Float) = 8 _Stencil("Stencil ID", Float) = 0 _StencilOp("Stencil Operation", Float) = 0 _StencilWriteMask("Stencil Write Mask", Float) = 255 _StencilReadMask("Stencil Read Mask", Float) = 255 _ColorMask("Color Mask", Float) = 15 [Toggle(UNITY_UI_ALPHACLIP)] _UseUIAlphaClip("Use Alpha Clip", Float) = 0 _Center("Center", vector) = (0 , 0 , 0 , 0 ) _Slider("_Slider", Range(0 ,1000 )) = 1000 } SubShader { Tags { "Queue" = "Transparent" "IgnoreProjector" = "True" "RenderType" = "Transparent" "PreviewType" = "Plane" "CanUseSpriteAtlas" = "True" } Stencil { Ref[_Stencil] Comp[_StencilComp] Pass[_StencilOp] ReadMask[_StencilReadMask] WriteMask[_StencilWriteMask] } Cull Off Lighting Off ZWrite Off ZTest[unity_GUIZTestMode] Blend SrcAlpha OneMinusSrcAlpha ColorMask[_ColorMask] Pass { Name "Default" CGPROGRAM #pragma vertex vert #pragma fragment frag #pragma target 2.0 #include "UnityCG.cginc" #include "UnityUI.cginc" #pragma multi_compile __ UNITY_UI_ALPHACLIP struct appdata_t { float4 vertex : POSITION; float4 color : COLOR; float2 texcoord : TEXCOORD0; UNITY_VERTEX_INPUT_INSTANCE_ID }; struct v2f { float4 vertex : SV_POSITION; fixed4 color : COLOR; float2 texcoord : TEXCOORD0; float4 worldPosition : TEXCOORD1; UNITY_VERTEX_OUTPUT_STEREO }; fixed4 _Color; fixed4 _TextureSampleAdd; float4 _ClipRect; float _Slider; float2 _Center; v2f vert(appdata_t IN) { v2f OUT; UNITY_SETUP_INSTANCE_ID(IN); UNITY_INITIALIZE_VERTEX_OUTPUT_STEREO(OUT); OUT.worldPosition = IN.vertex; OUT.vertex = UnityObjectToClipPos(OUT.worldPosition); OUT.texcoord = IN.texcoord; OUT.color = IN.color * _Color; return OUT; } sampler2D _MainTex; fixed4 frag(v2f IN) : SV_Target { half4 color = (tex2D(_MainTex, IN.texcoord) + _TextureSampleAdd) * IN.color; color.a *= UnityGet2DClipping(IN.worldPosition.xy, _ClipRect); #ifdef UNITY_UI_ALPHACLIP clip(color.a - 0.001 ); #endif color.a *= (distance (IN.worldPosition.xy,_Center.xy) > _Slider); color.rgb *= color.a; return color; } ENDCG } } }
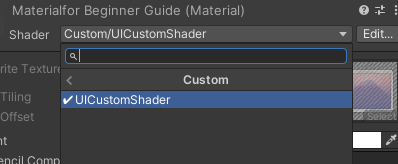
选择之前的material,然后载入shader
运行就可以了
书上的shader属于老版本