在Unity新版的动画系统中,必须创建Animator Controller文件,在音频系统中,也需要创建Audio Mixer文件用来编辑数据。如果游戏中模型动画很多,每一个都要用Animator Controller来连线的话太麻烦了。我们使用Playable API来更灵活地控制新版动画,像老版动画一样方便并且支持Avatar Mask、Blend Tree等新版动画的功能
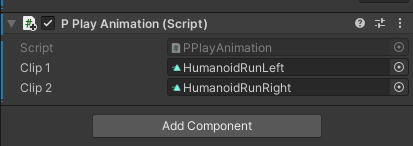
播放动画 Playables提供了工具类来直接控制播放动画,我们新建PPlayAnimation脚本,将待播放的动画剪辑通过AnimationPlayableUtilities.PlayClip()传递就可以
1
2
3
4
5
6
7
8
9
10
11
12
13
14
15
16
17
18
19
20
21
22
23
24
25
26
27
28
29
30
31
32
33
34
35
using System.Collections;using System.Collections.Generic;using UnityEngine;using UnityEngine.Playables;public class PPlayAnimation : MonoBehaviour { public AnimationClip clip1; public AnimationClip clip2; PlayableGraph m_PlayableGraph; private void OnGUI () { if (GUILayout.Button("<size=80>play clip1</size>" )) { if (m_PlayableGraph.IsValid()) m_PlayableGraph.Destroy(); AnimationPlayableUtilities.PlayClip(GetComponent<Animator>(), clip1, out m_PlayableGraph); } if (GUILayout.Button("<size=80>play clip2</size>" )) { if (m_PlayableGraph.IsValid()) m_PlayableGraph.Destroy(); AnimationPlayableUtilities.PlayClip(GetComponent<Animator>(), clip2, out m_PlayableGraph); } } private void OnDisable () { m_PlayableGraph.Destroy(); } }
每次应用AnimationPlayableUtilities.PlayClip(),都会创建新的PlayableGraph,所以我们需要不断判断并且销毁旧的PlayableGraph,为提高效率推荐使用Animancer插件
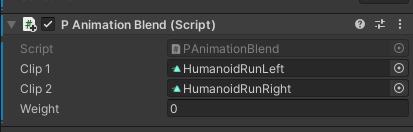
动画混合 使用Playables组件,也可以进行动画混合。
新建PAnimationBlend脚本
1
2
3
4
5
6
7
8
9
10
11
12
13
14
15
16
17
18
19
20
21
22
23
24
25
26
27
28
29
30
31
32
33
34
35
36
37
38
39
using System.Collections;using System.Collections.Generic;using UnityEngine;using UnityEngine.Playables;using UnityEngine.Animations;public class PAnimationBlend : MonoBehaviour { public AnimationClip clip1; public AnimationClip clip2; public float weight; PlayableGraph m_PlayableGraph; AnimationMixerPlayable m_AnimationMixerPlayable; private void Start () { m_AnimationMixerPlayable = AnimationPlayableUtilities.PlayMixer(GetComponent<Animator>(), 2 , out m_PlayableGraph); var clipPlayable1 = AnimationClipPlayable.Create(m_PlayableGraph, clip1); var clipPlayable2 = AnimationClipPlayable.Create(m_PlayableGraph, clip2); m_PlayableGraph.Connect(clipPlayable1, 0 , m_AnimationMixerPlayable, 0 ); m_PlayableGraph.Connect(clipPlayable2, 0 , m_AnimationMixerPlayable, 1 ); } void Update () { weight = Mathf.Clamp01(weight); m_AnimationMixerPlayable.SetInputWeight(0 , 1.0f - weight); m_AnimationMixerPlayable.SetInputWeight(1 , weight); } private void OnDisable () { m_PlayableGraph.Destroy(); } }
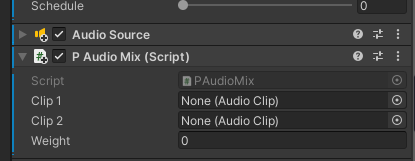
音频混合 音频文件需要使用AudioSource来播放。如果要混合音频,需要在Project窗口中创建Audio Mixer文件。
使用Playables组件时,可以不用创建Mixer文件,通过脚本就可以灵活地控制混合。
新建PAudioMix脚本
1
2
3
4
5
6
7
8
9
10
11
12
13
14
15
16
17
18
19
20
21
22
23
24
25
26
27
28
29
30
31
32
33
34
35
36
37
38
39
40
41
42
43
44
45
46
47
using System.Collections;using System.Collections.Generic;using UnityEngine;using UnityEngine.Audio;using UnityEngine.Playables;public class PAudioMix : MonoBehaviour { public AudioClip clip1; public AudioClip clip2; public float weight; PlayableGraph m_PlayableGraph; AudioMixerPlayable m_AudioMixerPlayable; void Start () { m_PlayableGraph = PlayableGraph.Create(); m_AudioMixerPlayable = AudioMixerPlayable.Create(m_PlayableGraph, 2 ); var audioClipPlayable1 = AudioClipPlayable.Create(m_PlayableGraph, clip1, true ); var audioClipPlayable2 = AudioClipPlayable.Create(m_PlayableGraph, clip2, true ); m_PlayableGraph.Connect(audioClipPlayable1, 0 , m_AudioMixerPlayable, 0 ); m_PlayableGraph.Connect(audioClipPlayable2, 0 , m_AudioMixerPlayable, 1 ); var audioPlayableOutput = AudioPlayableOutput.Create(m_PlayableGraph, "Audio" , GetComponent<AudioSource>()); audioPlayableOutput.SetSourcePlayable(m_AudioMixerPlayable); m_PlayableGraph.Play(); } void Update () { weight = Mathf.Clamp01(weight); m_AudioMixerPlayable.SetInputWeight(0 , 1.0f - weight); m_AudioMixerPlayable.SetInputWeight(1 , weight); } private void OnDisable () { m_PlayableGraph.Destroy(); } }
自定义脚本 使用Playables组件,既可以控制动画和音频,也可以创建自定义脚本。像timeline一样,我们可以在代码中更精准地控制每一帧的状态。
和前面介绍的音频混合一样,自定义Playable组件也需要使用Output将它输出出来
新建PCustomScript脚本,首先使用ScriptPlayable<T>.Create()创建自定义的PlayableBehaviour,接着使用SetSourcePlayable()进行关联即可。我们也可以像音频和动画那样为自定义脚本添加Mixer
1
2
3
4
5
6
7
8
9
10
11
12
13
14
15
16
17
18
19
20
21
22
23
24
25
26
27
using System.Collections;using System.Collections.Generic;using UnityEngine;using UnityEngine.Playables;public class PCustomScript : MonoBehaviour { private PlayableGraph m_PlayableGraph; void Start () { m_PlayableGraph = PlayableGraph.Create(); var customPlayable = ScriptPlayable<CustomPlayableBehaviour>.Create(m_PlayableGraph); var customOutput = ScriptPlayableOutput.Create(m_PlayableGraph, "customOutput" ); customOutput.SetSourcePlayable(customPlayable); m_PlayableGraph.Play(); } private void OnDisable () { m_PlayableGraph.Destroy(); } }
实现CustomPlayableBehaviour,像之间timeline中的PlayableTrack一样,也是继承PlayableBehaviour,监听开始或结束的触发事件。
1
2
3
4
5
6
7
8
9
10
11
12
13
14
15
16
17
18
19
20
21
22
23
24
25
26
27
28
29
using System.Collections;using System.Collections.Generic;using UnityEngine;using UnityEngine.Playables;public class CustomPlayableBehaviour : PlayableBehaviour { public override void OnGraphStart (Playable playable ) { Debug.Log("PlayableGraph开始时触发" ); } public override void OnGraphStop (Playable playable ) { Debug.Log("PlayableGraph结束时触发" ); } public override void OnBehaviourPlay (Playable playable, FrameData info ) { Debug.Log("脚本开始时触发" ); } public override void OnBehaviourPause (Playable playable, FrameData info ) { Debug.Log("脚本暂停时触发" ); } public override void PrepareFrame (Playable playable, FrameData info ) { } }
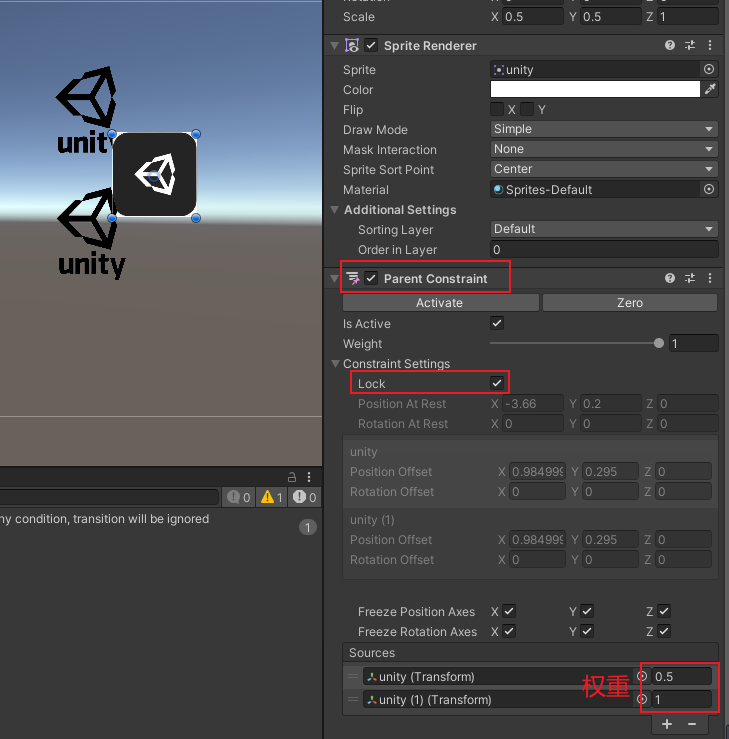
Constraint 使用Constraint,可以在非父子级关系下同时影响两个平级对象
Aim Constraint Aim Constraint用于控制游戏对象始终朝向另一个游戏对象。没有该特性之前,我们使用transform.LookAt(target)方法,但Aim Constraint的功能更加全面。
如上图所示,给A对象绑定Aim Constraint组件,在Source中关联另外两个游戏对象B和C,表示A会同时瞄准B和C。Weight表示设置瞄准的权重。下面还可以设置偏移的角度、坐标以及冻结的轴向。
Parent Constraint 使用Parent Constraint,就可以实现平级关系下类似父子级关系的操作,这里的Sources即为关联的父对象,打开Constraint Settings里的Lock,就可以相互锁定位置,每一个父对象都可以设置自己的权重
脚本控制约束 我们当然可以使用自己的脚本来控制约束脚本
1
2
3
4
5
6
7
8
9
10
11
12
13
14
15
16
using System.Collections;using System.Collections.Generic;using UnityEngine;using UnityEngine.Animations;public class CustomParentConstraint : MonoBehaviour { public ParentConstraint parentConstraint; private void OnGUI () { if (GUILayout.Button("constraintActive" )) { parentConstraint.constraintActive = !parentConstraint.constraintActive; } } }