特殊内置的文件夹
特殊文件夹名称 - Unity 手册 (unity3d.com)
Assets文件夹:游戏资源的顶层文件夹。AssetDataBase方法可以访问里面的任意资源。注意AssetDataBase连Packages文件夹也能访问,所以其中的一些函数需要将Assets文件夹作为路径名的一部分添加。
Editor文件夹:编辑模式下的代码需要放在这里。可以有多个。Editor文件夹中的Resources文件夹内容会被EditorUtility.Load函数来加载。打包以后,会自动剥离它。
Editor Default Resources文件夹:编辑器资源文件夹,可以被EditorUtility.Load函数来加载,编辑模式下的编辑器需要的资源尽可能放在这里。此文件夹只能有一个,且必须放在项目的根目录(Assets文件夹)中,可以在其中有子文件夹,在EditorUtility.Load函数中调用时明确其路径即可。
Gizmos文件夹:Gizmos是一个拓展Scene视图的类,注意它和Debug.DrawLine等Debug类的区别,在Gizmos文件夹中可以放置一些图标,这些图标可以被Gizmos.DrawIcon函数调用,用在Scene视图上。
Plugins文件夹:此文件夹下的代码会优先编译特殊文件夹和脚本编译顺序 - Unity 手册 (unity3d.com)
Resources文件夹:该目录下的所有资源都会自动构建在包体内(除了作为Editor子文件夹的Resources),可使用Resources.Load()来加载资源
Standard Assets文件夹:导入外部的标准资源包(Assets——Import Package)时创建的文件夹,这里面的脚本和插件会优先编译运行。此文件夹只能有一个,且必须放在项目的根目录(Assets文件夹)中。
StreamingAssets文件夹:AssetBundle或者整体的视频文件(流媒体资源)流媒体资源 - Unity 手册 (unity3d.com)放在此文件夹,以保持文件的完整性,防止Unity构建时将一些文件重压缩或者改变。
隐藏文件夹
游戏包在发布时有两种模式:
- 大包模式:所有的游戏资源都放在包内。
- 小包模式:只保留最基础的部分,像一个小下载器,大部分资源需要额外下载。
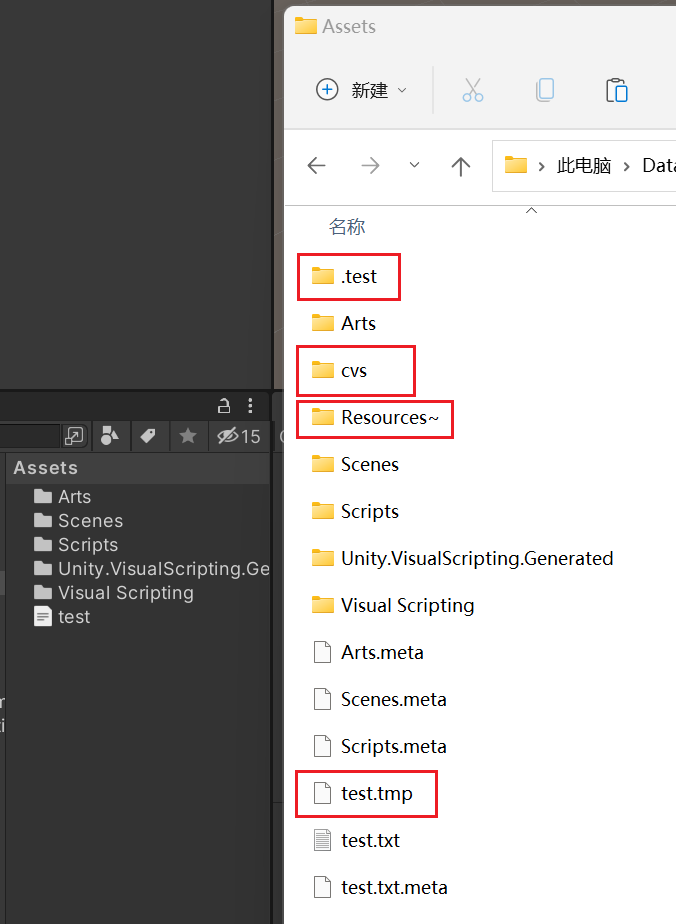
大包游戏很多资源都放在Resources目录下,如果此时需要打小包,就必须把Resources文件夹改个名字或者移出工程。我们可以把文件夹命名为“Resouces~”,这样此文件夹就会在Project窗口中忽略,也不会被打包。此外,还有一些文件的忽略规则:
- 名字开头为“.”的文件夹以及文件会被隐藏忽略
- 名字结尾为“~”的文件夹以及文件会被隐藏忽略
- 名字是cvs的文件和文件夹会被隐藏忽略
- 拓展名是“.tmp”的文件会被隐藏忽略
- 在系统中直接设置为隐藏属性的文件和文件夹会被隐藏忽略
Resources与AssetBundle无缝切换
使用一个自定义的类来封装Resources和AssetBundle的读取方法。我们构建AssetBundle的时候记录资源和Bundle之间的引用关系,通过Resources加载的目录立即取到对应AssetBundle的加载目录进行无缝切换。
在Editor文件夹中,新建BuildAB文件
1
2
3
4
5
6
7
8
9
10
11
12
13
14
15
16
17
18
19
20
21
22
23
24
25
26
27
28
29
30
31
32
33
34
35
36
37
38
39
40
41
42
43
44
45
46
47
48
| using System.Collections.Generic;
using UnityEngine;
using UnityEditor;
using System.IO;
public class BuildAB
{
[MenuItem("Tools/BuildAssetBundle")]
static void BuildAssetbundle()
{
string outPath = Path.Combine(Application.dataPath,"StreamingAssets");
if(Directory.Exists(outPath))
Directory.Delete(outPath,true);
Directory.CreateDirectory(outPath);
List<AssetBundleBuild> builds = new List<AssetBundleBuild>();
builds.Add(new AssetBundleBuild(){
assetBundleName="Cube.unity3d",
assetNames = new string[]{
"Assets/Resources/Cube.prefab",
"Assets/Resources/Cube 1.prefab"
}});
BuildPipeline.BuildAssetBundles(
outPath,
builds.ToArray(),
BuildAssetBundleOptions.DeterministicAssetBundle,
BuildTarget.StandaloneWindows);
BundleList bundleList = ScriptableObject.CreateInstance<BundleList>();
foreach (var item in builds)
{
foreach (var res in item.assetNames)
{
bundleList.bundleDatas.Add(new BundleList.BundleData(){ resPath = res,bundlePath = item.assetBundleName});
}
}
AssetDatabase.CreateAsset(bundleList,"Assets/Resources/bundleList.asset");
AssetDatabase.Refresh();
}
}
|
这是BundleList脚本,它是一个ScriptableObject,用来序列化资源路径和AssetBundle加载路径。
1
2
3
4
5
6
7
8
9
10
11
12
13
14
15
16
| using System.Collections.Generic;
using UnityEngine;
[System.Serializable]
public class BundleList : ScriptableObject
{
public List<BundleData> bundleDatas = new List<BundleData>();
[System.Serializable]
public class BundleData
{
public string resPath = string.Empty;
public string bundlePath = string.Empty;
}
}
|
自定义一个Assets类来代替Resources类,然后调用Assets.LoadAsset<T>来加载,该方法判断是否有AssetBundle,有就采用AssetBundle加载,没有就采用Resources加载。
新建CustomRes脚本
1
2
3
4
5
6
7
8
9
10
11
12
13
14
15
16
17
18
19
20
21
22
23
24
25
26
27
28
29
30
31
32
33
34
35
36
37
38
39
| using System.Collections.Generic;
using UnityEngine;
using System.IO;
public class Assets
{
static Dictionary<string,string> m_ResAbDic = new Dictionary<string, string>();
static Dictionary<string,AssetBundle> m_BundleCache = new Dictionary<string, AssetBundle>();
static Assets()
{
BundleList bundleList = Resources.Load<BundleList>("bundleList");
foreach (var bundleData in bundleList.bundleDatas)
{
m_ResAbDic[bundleData.resPath] = bundleData.bundlePath;
}
}
static public T LoadAsset<T>(string path) where T : Object
{
string bundlePath;
string resPath = Path.Combine("Assets/Resources",path);
if(typeof(T) == typeof(GameObject))
resPath = Path.ChangeExtension(resPath,"prefab");
if(m_ResAbDic.TryGetValue(resPath,out bundlePath))
{
AssetBundle assetBundle;
if(!m_BundleCache.TryGetValue(bundlePath,out assetBundle))
{
assetBundle = m_BundleCache[bundlePath] = AssetBundle.LoadFromFile(Path.Combine(Application.streamingAssetsPath,bundlePath));
}
return assetBundle.LoadAsset<T>(resPath);
}
return Resources.Load<T>(path);
}
}
|
下面是一个调用资源的用例
1
2
3
4
5
6
7
8
9
10
11
12
13
14
| using UnityEngine;
public class TestCustomAssetsLoad : MonoBehaviour
{
void Start()
{
GameObject prefab = Assets.LoadAsset<GameObject>("Cube");
Instantiate<GameObject>(prefab);
GameObject prefab2 = Assets.LoadAsset<GameObject>("Cube 1");
Instantiate<GameObject>(prefab2);
}
}
|

资源加载策略
AssetBundle大部分情况下是需要从网络加载的,所以还需要有下载AssetBundle这一步骤,整个AssetBundle的加载策略如下:
- 从Application.persistentDataPath目录中查找可读写目录下是否有需要加载的AssetBundle。
- 如果第一步没加载到资源,接着在Application.streamingAssetsPath目录中查找本地是否有需要加载的AssetBundle。
- 如果第二步没加载到资源,接着在Resources目录下加载文件。
按照这个加载策略,就可以保证用户加载的永远是最新的资源。另外,整个加载策略还需要考虑AssetBundle卸载的时机。不然,由于AssetBundle引用Assets,导致Asset无法被卸载掉了。
资源更新
资源更新就是将CDN上的资源下载并保存在Application.persistentDataPath目录中,然后按照上面的顺序加载资源,首先,要维护一个下载资源列表,里面记录了每个资源的散列值(也就是Hash,方法有MD5、SHA-1、SHA-256),这样应用程序启动的时候,检测一遍包体资源的散列值,然后和远端CDN中保存的散列值做比较,决定是否需要下载更新。
为了避免重复下载,必须要保证每次形同资源构建出来的AssetBundle是一致的。在构建方法中必须设置BuildAssetBundleOptions.DeterminsticAssetBundle,这样可以保证打包资源的一致性。另外,AssetBundle文件是不能信任MD5的。Unity提供了一个散列值来约束一致性,代码中需要调用AssetBundleManifest.GetAssetBundleHash方法来提取散列值,从而来比较是否需要更新,这样就能避免重复下载的情况了。
资源引用关系
右键单击任意资源后,在右键菜单中有一些快捷功能
- Find References In Scene:表示查找这个资源在当前场景中的什么地方引用。
- Select Dependencies:表示查找这个资源引用了哪些资源
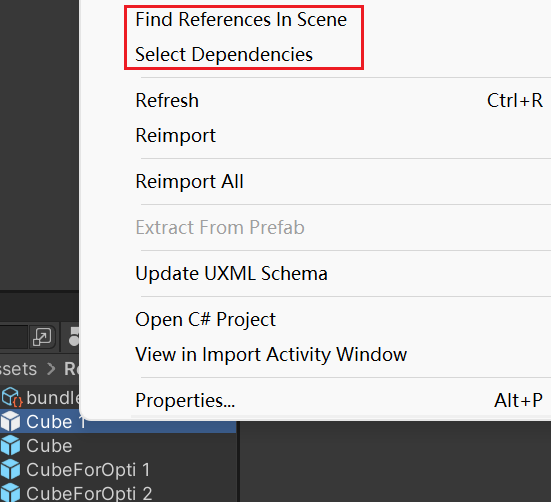
Unity只提供了某个资源引用了什么资源,但是并没有提供某个资源被什么资源所引用。
我们自己写一种查找方法,来查询这个资源被哪些资源所引用。
1
2
3
4
5
6
7
8
9
10
11
12
13
14
15
16
17
18
19
20
21
22
23
24
25
26
27
28
29
30
31
32
33
34
35
36
37
38
39
40
41
42
43
44
45
46
47
48
49
50
51
52
53
54
55
56
57
58
59
60
61
62
63
64
65
66
67
68
69
70
| using System.Collections.Generic;
using UnityEngine;
using UnityEditor;
using System.IO;
using System.Linq;
using System.Text.RegularExpressions;
public class FindReferences
{
[MenuItem("Assets/Find References",false,10)]
static private void Find()
{
Dictionary<string,string> guidDics = new Dictionary<string, string>();
foreach (Object o in Selection.objects)
{
string path = AssetDatabase.GetAssetPath(o);
if(!string.IsNullOrEmpty(path))
{
string guid = AssetDatabase.AssetPathToGUID(path);
if(!guidDics.ContainsKey(guid))
guidDics[guid] = o.name;
}
}
if(guidDics.Count > 0)
{
List<string> withoutExtensions = new List<string>()
{
".prefab",
".unity",
".mat",
".asset"
};
string[] files = Directory.GetFiles(Application.dataPath,"*.*",SearchOption.AllDirectories)
.Where(s => withoutExtensions.Contains(Path.GetExtension(s).ToLower()))
.ToArray();
for (int i = 0; i < files.Length; i++)
{
string file = files[i];
if(i%20 == 0){
bool isCancel = EditorUtility.DisplayCancelableProgressBar(
"匹配资源中",file,(float)i / (float)files.Length
);
if(isCancel)
break;
}
foreach (KeyValuePair<string,string> guidItem in guidDics)
{
if(Regex.IsMatch(File.ReadAllText(file),guidItem.Key)){
Debug.Log(string.Format("name:{0} file:{1}",guidItem.Value,file),AssetDatabase.LoadAssetAtPath<Object>(GetRelativeAssetsPath(file)));
}
}
}
EditorUtility.ClearProgressBar();
Debug.Log("匹配结束");
}
}
static private string GetRelativeAssetsPath(string path)
{
return "Assets" + Path.GetFullPath(path).Replace(Path.GetFullPath(Application.dataPath),"").Replace("\\","/");
}
[MenuItem("Assets/Find References",true)]
static private bool VFind()
{
string path = AssetDatabase.GetAssetPath(Selection.activeObject);
return(!string.IsNullOrEmpty(path));
}
}
|
选择任意资源,点击Find References菜单,即可查找该资源被哪里引用了。

系统资源修改
Unity有很多系统资源,其后缀名是.asset。在各类设置面板中,Unity会将很多配置序列化进去,但是可能并没有对外提供修改的接口,特定的时候我们需要脚本来自动修改它。
ProjectSettings中的资源都是系统资源,Assets目录下创建的一些资源也是系统资源。
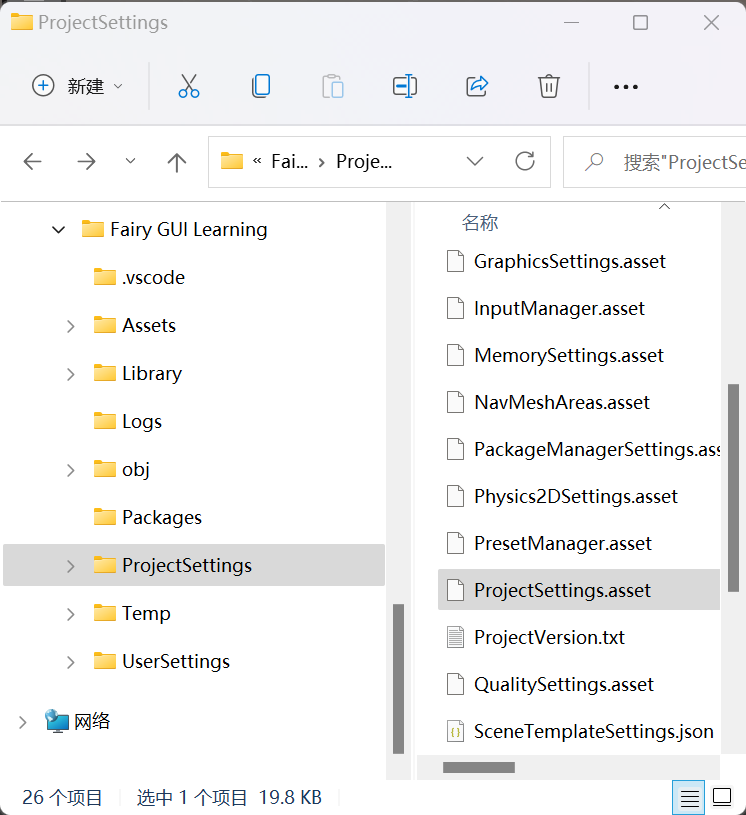
我们可以打开ProjectSettings,随便找个属性来修改,比如m_SplashScreenBackgroundColor背景颜色这一栏。
1
2
3
4
5
6
7
8
9
10
11
12
13
14
15
16
17
18
19
20
21
22
23
24
25
26
27
28
29
30
| %YAML 1.1
%TAG !u! tag:unity3d.com,2011:
--- !u!129 &1
PlayerSettings:
m_ObjectHideFlags: 0
serializedVersion: 23
productGUID: 02b5d32194c0e3a4ab50cc7637ec778c
AndroidProfiler: 0
AndroidFilterTouchesWhenObscured: 0
AndroidEnableSustainedPerformanceMode: 0
defaultScreenOrientation: 4
targetDevice: 2
useOnDemandResources: 0
accelerometerFrequency: 60
companyName: DefaultCompany
productName: Fairy GUI Learning
defaultCursor: {fileID: 0}
cursorHotspot: {x: 0, y: 0}
m_SplashScreenBackgroundColor: {r: 0.13725491, g: 0.12156863, b: 0.1254902, a: 1}
m_ShowUnitySplashScreen: 1
m_ShowUnitySplashLogo: 1
m_SplashScreenOverlayOpacity: 1
m_SplashScreenAnimation: 1
m_SplashScreenLogoStyle: 1
m_SplashScreenDrawMode: 0
m_SplashScreenBackgroundAnimationZoom: 1
m_SplashScreenLogoAnimationZoom: 1
m_SplashScreenBackgroundLandscapeAspect: 1
m_SplashScreenBackgroundPortraitAspect: 1
m_SplashScreenBackgroundLandscapeUvs:
|
这些属性也是属于ScriptableObject的范围,相关知识在“第四章——脚本序列化”学到过
1
2
3
4
5
6
7
8
9
10
11
12
13
14
15
16
17
18
19
20
| using UnityEngine;
using UnityEditor;
public class ModifySystemAssets
{
[MenuItem("Tools/EditValue")]
static void EditValue()
{
const string projectSettingAssetPath = "ProjectSettings/ProjectSettings.asset";
SerializedObject projectSetting = new SerializedObject(AssetDatabase.LoadAssetAtPath<Object>(projectSettingAssetPath));
SerializedProperty m_SplashScreenBackgroundColor = projectSetting.FindProperty("m_SplashScreenBackgroundColor");
Debug.LogFormat("当前的颜色值{0}",m_SplashScreenBackgroundColor.colorValue);
m_SplashScreenBackgroundColor.colorValue = Color.yellow;
projectSetting.ApplyModifiedProperties();
AssetDatabase.SaveAssets();
}
}
|
只要是Unity自己的.asset资源,都可以使用上述方法来自动修改它。但是它只支持在编辑模式下修改,运行模式下是不行的
AssetBundle里的脚本
AssetBundle里面的prefab大部分情况下是有脚本的,但是这和脚本热更新是不同的概念。前面讲过,资源之间的依赖关系是通过guid来关联的,其实脚本也一样。每一个脚本都对应一个.meta文件,打开后就能看到每个脚本对应的guid数值。
下面是一个脚本的.meta文件内容
1
2
3
4
5
6
7
8
9
10
11
| fileFormatVersion: 2
guid: 730350dfaf370424e8bd1ea876e1fadb
MonoImporter:
externalObjects: {}
serializedVersion: 2
defaultReferences: []
executionOrder: 0
icon: {instanceID: 0}
userData:
assetBundleName:
assetBundleVariant:
|
如果有个prefab引用了这个脚本,那么用文本的形式打开prefab就能看到。注意是prefab,不是prefab的.meta
1
2
3
4
5
6
7
8
9
10
11
12
13
14
15
16
17
18
19
20
21
22
23
24
| %YAML 1.1
%TAG !u! tag:unity3d.com,2011:
--- !u!1 &5108821664944725578
GameObject:
--- !u!4 &5108821664944725582
Transform:
--- !u!33 &5108821664944725583
MeshFilter:
--- !u!23 &5108821664944725576
MeshRenderer:
--- !u!65 &5108821664944725577
BoxCollider:
--- !u!114 &568106553959220040
MonoBehaviour:
m_ObjectHideFlags: 0
m_CorrespondingSourceObject: {fileID: 0}
m_PrefabInstance: {fileID: 0}
m_PrefabAsset: {fileID: 0}
m_GameObject: {fileID: 5108821664944725578}
m_Enabled: 1
m_EditorHideFlags: 0
m_Script: {fileID: 11500000, guid: 730350dfaf370424e8bd1ea876e1fadb, type: 3}
m_Name:
m_EditorClassIdentifier:
|
也就是说AssetBundle内部的脚本在实际运行时,Unity只会找游戏包里对应这个guid的脚本。脚本是直接覆盖运行的,并不是所谓的热更新。
热更新代码
Unity的脚本是无法热更新的,但是DLL是可以热更新的。我们可以将多个.cs文件打入DLL中,通过下载的方式来更新游戏代码。
首先写一个静态类,封装一个静态方法。我们将这个类编译成dll,临时放在StreamingAssets/HotUpdate.dll下。
Visual Studio Code只是一个简易的文本编辑器,不具备Visual Studio的编译DLL的功能
1
2
3
4
5
6
7
| public class TestForHotUpdate
{
static public string GetName()
{
return "HotUpdate";
}
}
|
通过反射来执行dll的内部方法
1
2
3
4
5
6
7
8
9
10
11
12
13
14
15
16
17
18
19
20
21
22
| using UnityEngine;
using System.Reflection;
using System;
public class DisplayHotUpdate : MonoBehaviour
{
private string m_HotUpdateInfo = string.Empty;
private void Start() {
Assembly assembly = Assembly.LoadFrom(Application.streamingAssetsPath+"/TestForHotUpdate.dll");
Type type = assembly.GetType("TestForHotUpdate");
MethodInfo mi = type.GetMethod("GetName");
m_HotUpdateInfo = mi.Invoke(null,new object[]{}).ToString();
}
private void OnGUI() {
GUILayout.Label(string.Format("<size=80>{0}</size>",m_HotUpdateInfo));
}
}
|
苹果平台禁止了JIT(即时编译器),所以热更新DLL文件在IOS平台是不支持的,只Android和PC平台是支持的