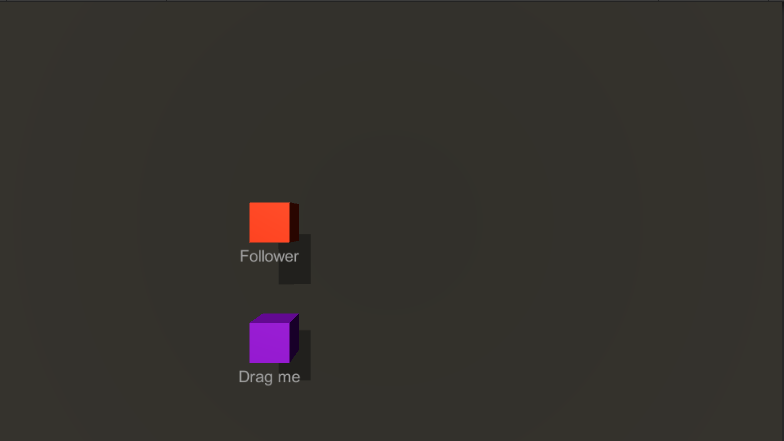
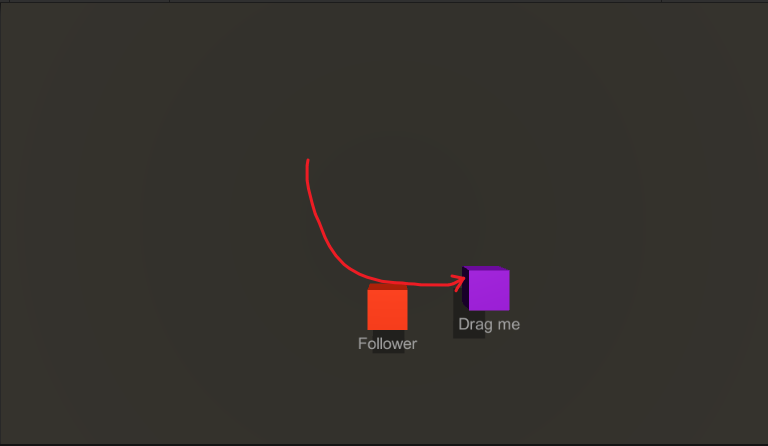
voidUpdate() { // 在Update阶段每帧更新tweener的EndValue() // so that it updates to the target's position if that changed if (targetLastPos == target.position) return; // 使用ReStart(),来让tweener重新播放 tween.ChangeEndValue(target.position, true).Restart(); targetLastPos = target.position; } }
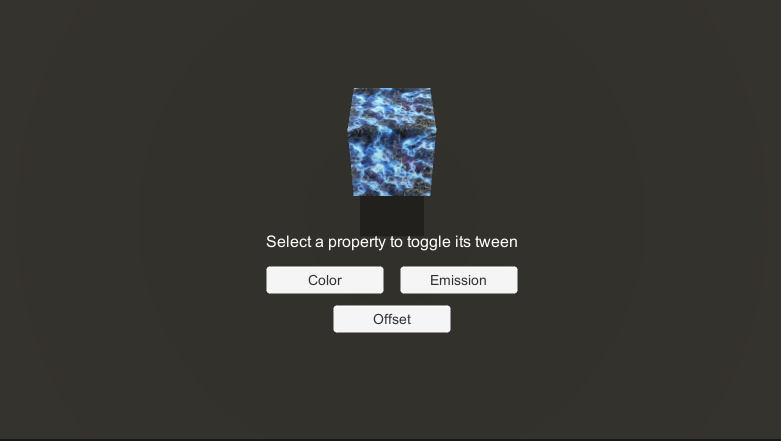
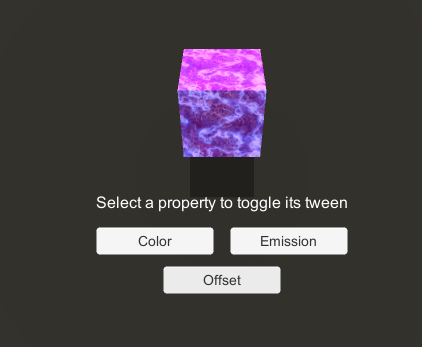
// EMISSION贴图动画 // 注意在Unity的inspector中的EmissionColor是不能直接应用到材质的,我们必须直接书写shader中的名称 // doesn't really exist in the shader (it's generated by Unity's inspector and applied to the material's color), // se we have to tween the full _EmissionColor. emissionTween = mat.DOColor(new Color(0, 0, 0, 0), "_EmissionColor", 1).SetLoops(-1, LoopType.Yoyo).Pause();
using UnityEngine; using System.Collections; using DG.Tweening;
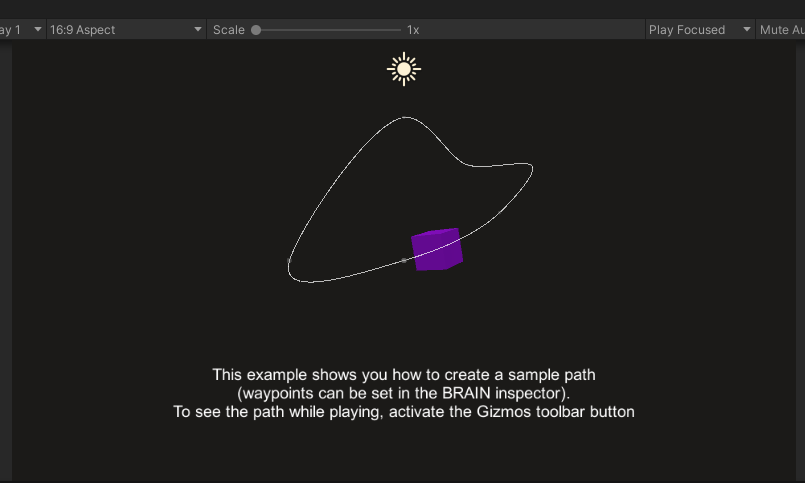
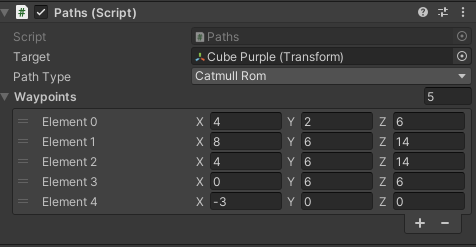
publicclassPaths : MonoBehaviour { public Transform target; public PathType pathType = PathType.CatmullRom; public Vector3[] waypoints = new[] { new Vector3(4, 2, 6), new Vector3(8, 6, 14), new Vector3(4, 6, 14), new Vector3(0, 6, 6), new Vector3(-3, 0, 0) };
voidStart() { // Create a path tween using the given pathType, Linear or CatmullRom (curved). // 使用SetOptions(true)来闭合路径 // and SetLookAt to make the target orient to the path itself Tween t = target.DOPath(waypoints, 4, pathType) .SetOptions(true) .SetLookAt(0.001f); // Then set the ease to Linear and use infinite loops t.SetEase(Ease.Linear).SetLoops(-1); } }
IEnumerator Start() { // Start after one second delay (to ignore Unity hiccups when activating Play mode in Editor) yieldreturnnewWaitForSeconds(1);
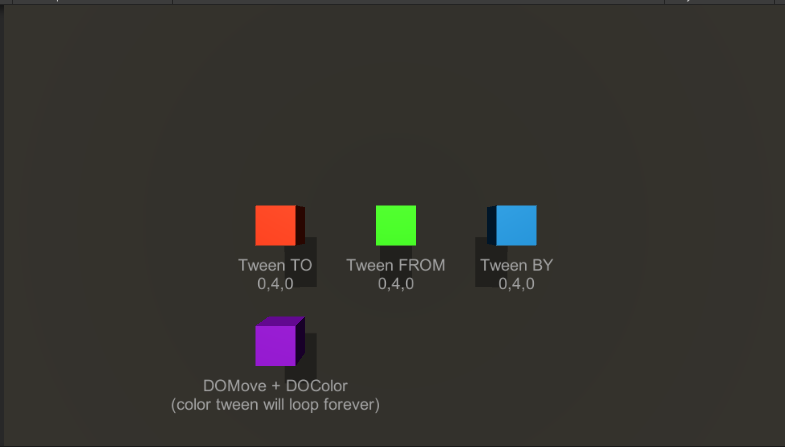
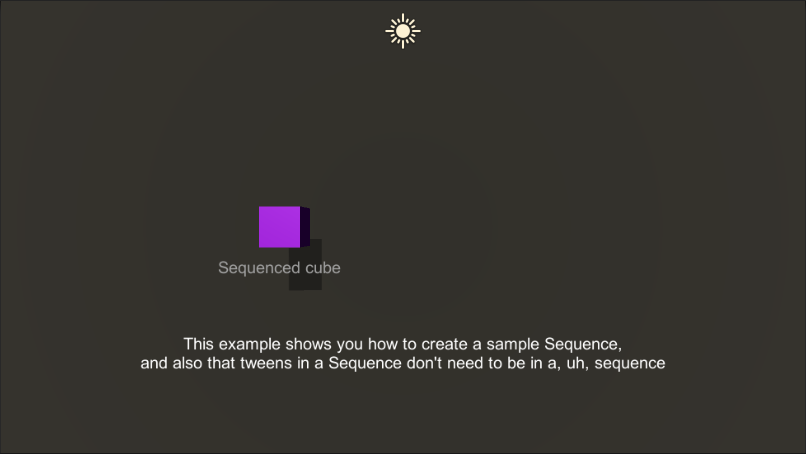
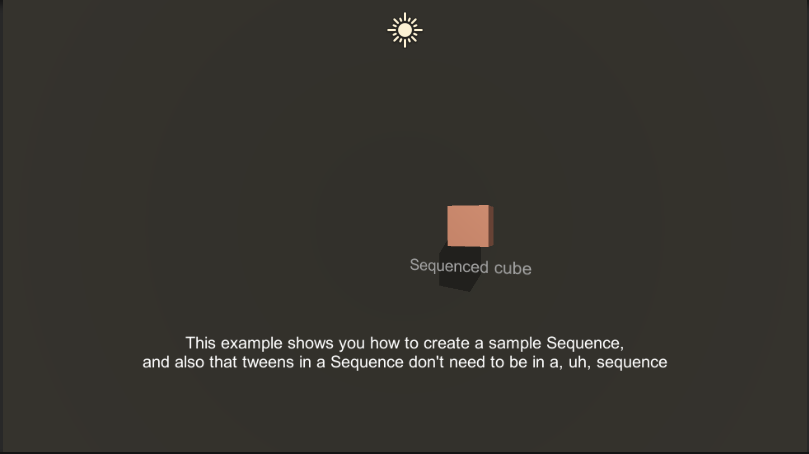
// 使用DOTween.Sequence来新建并返回一个新的Sequence实例. // We will set it so that the whole duration is 6 Sequence s = DOTween.Sequence(); // Add an horizontal relative move tween that will last the whole Sequence's duration s.Append(cube.DOMoveX(6, duration).SetRelative().SetEase(Ease.InOutQuad)); // 在Sequence开始执行时插入一个旋转补间,并且持续一半时间 // and will loop forward and backward twice s.Insert(0, cube.DORotate(new Vector3(0, 45, 0), duration / 2).SetEase(Ease.InQuad).SetLoops(2, LoopType.Yoyo)); // 在Sequence执行一半时插入一个颜色变化补间,并且持续一半时间 s.Insert(duration / 2, cube.GetComponent<Renderer>().material.DOColor(Color.yellow, duration / 2)); // 循环整个sequence s.SetLoops(-1, LoopType.Yoyo); } }
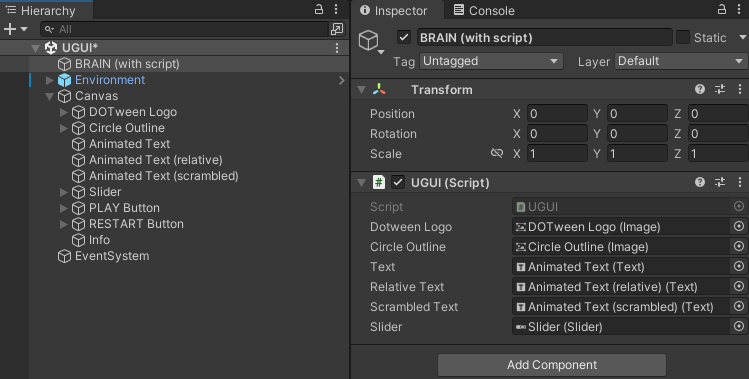
using UnityEngine; using UnityEngine.UI; using System.Collections; using DG.Tweening;
publicclassUGUI : MonoBehaviour { public Image dotweenLogo, circleOutline; public Text text, relativeText, scrambledText; public Slider slider;
voidStart() { // All tweens are created in a paused state (by chaining to them a final Pause()), // so that the UI Play button can activate them when pressed. // 没有设置无限循环的UI动画应该将AutoKill设为False,这样才可以Restart
// Animate the fade out of DOTween's logo dotweenLogo.DOFade(0, 1.5f).SetAutoKill(false).Pause();
// Animate the circle outline's color and fillAmount,将image type改为Filled circleOutline.DOColor(RandomColor(), 1.5f).SetEase(Ease.Linear).Pause(); circleOutline.DOFillAmount(0, 1.5f).SetEase(Ease.Linear).SetLoops(-1, LoopType.Yoyo) .OnStepComplete(()=> { circleOutline.fillClockwise = !circleOutline.fillClockwise;//转换顺时针和逆时针填充方式 circleOutline.DOColor(RandomColor(), 1.5f).SetEase(Ease.Linear); }) .Pause();
// Animate the first text... text.DOText("This text will replace the existing one", 2).SetEase(Ease.Linear).SetAutoKill(false).Pause(); // Animate the second (relative) text...使用SetRelative来添加 relativeText.DOText(" - This text will be added to the existing one", 2).SetRelative().SetEase(Ease.Linear).SetAutoKill(false).Pause(); // Animate the third (scrambled) text...设定ScrambleMode.All,就可以实现跳动出字的效果 scrambledText.DOText("This text will appear from scrambled chars", 2, true, ScrambleMode.All).SetEase(Ease.Linear).SetAutoKill(false).Pause();
// Animate the slider slider.DOValue(1, 1.5f).SetEase(Ease.InOutQuad).SetLoops(-1, LoopType.Yoyo).Pause(); }
// Called by PLAY button OnClick event. Starts all tweens publicvoidStartTweens() { DOTween.PlayAll(); }
// Called by RESTART button OnClick event. Restarts all tweens publicvoidRestartTweens() { DOTween.RestartAll(); }
// Returns a random color Color RandomColor() { returnnew Color(Random.Range(0f, 1f), Random.Range(0f, 1f), Random.Range(0f, 1f), 1); } }
using DG.Tweening; using DG.Tweening.Core; using DG.Tweening.Core.Easing; using DG.Tweening.Core.Enums; using DG.Tweening.Plugins.Core; using DG.Tweening.Plugins.Options; using System; using UnityEngine;
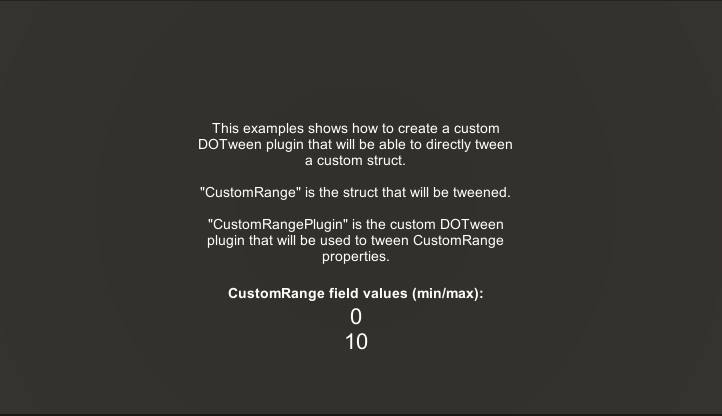
///<summary> /// Custom DOTween plugin example. /// This one tweens a CustomRange value, but you can also create plugins just to do weird stuff, other than to tween custom objects ///</summary> publicclassCustomRangePlugin : ABSTweenPlugin<CustomRange, CustomRange, NoOptions> { // Leave this empty publicoverridevoidReset(TweenerCore<CustomRange, CustomRange, NoOptions> t) {}
// Sets the values in case of a From tween 实现From publicoverridevoidSetFrom(TweenerCore<CustomRange, CustomRange, NoOptions> t, bool isRelative) { CustomRange prevEndVal = t.endValue; t.endValue = t.getter(); t.startValue = isRelative ? t.endValue + prevEndVal : prevEndVal; t.setter(t.startValue); }
// Sets the values in case of a From tween with a specific from value publicoverridevoidSetFrom(TweenerCore<CustomRange, CustomRange, NoOptions> t, CustomRange fromValue, bool setImmediately, bool isRelative) { t.startValue = fromValue; if (setImmediately) t.setter(fromValue); }
// Used by special plugins, just let it return the given value publicoverride CustomRange ConvertToStartValue(TweenerCore<CustomRange, CustomRange, NoOptions> t, CustomRange value) { returnvalue; }
// Determines the correct endValue in case this is a relative tween publicoverridevoidSetRelativeEndValue(TweenerCore<CustomRange, CustomRange, NoOptions> t) { t.endValue = t.startValue + t.changeValue; }
// Sets the overall change value of the tween publicoverridevoidSetChangeValue(TweenerCore<CustomRange, CustomRange, NoOptions> t) { t.changeValue = t.endValue - t.startValue; }
// Converts a regular duration to a speed-based duration publicoverridefloatGetSpeedBasedDuration(NoOptions options, float unitsXSecond, CustomRange changeValue) { // Not implemented in this case (but you could implement your own logic to convert duration to units x second) return unitsXSecond; }
// Calculates the value based on the given time and ease publicoverridevoidEvaluateAndApply(NoOptions options, Tween t, bool isRelative, DOGetter<CustomRange> getter, DOSetter<CustomRange> setter, float elapsed, CustomRange startValue, CustomRange changeValue, float duration, bool usingInversePosition, UpdateNotice updateNotice) { float easeVal = EaseManager.Evaluate(t, elapsed, duration, t.easeOvershootOrAmplitude, t.easePeriod);
// Here I use startValue directly because CustomRange a struct, so it won't reference the original. // If CustomRange was a class, I should create a new one to pass to the setter startValue.min += changeValue.min * easeVal; startValue.max += changeValue.max * easeVal; setter(startValue); } }
using DG.Tweening; using DG.Tweening.Plugins; using UnityEngine; using UnityEngine.UI;
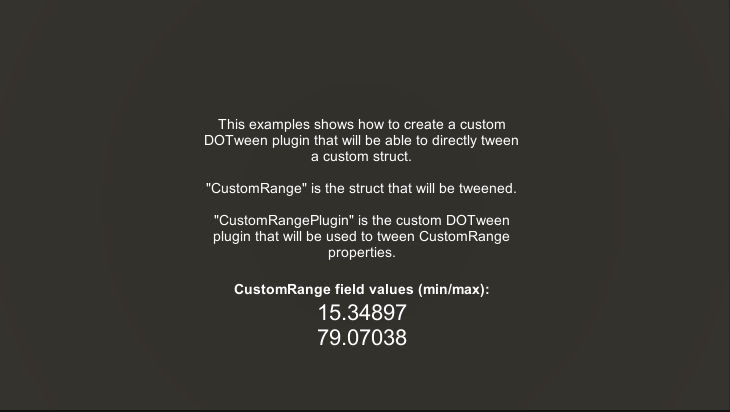
publicclassCustomPluginExampleBrain : MonoBehaviour { public Text txtCustomRange ; // Used to show the custom range tween results
CustomRange customRange = new CustomRange(0, 10);
// Store the plugin so you won't have to instantiate it every time you use it // (you can pass the same plugin instance to each tween, since they just do calculations and don't store data) static CustomRangePlugin customRangePlugin = new CustomRangePlugin();
voidStart() { // The difference with the regular generic way is simply // that you have to pass the plugin to use as an additional first parameter DOTween.To(customRangePlugin, () => customRange, x => customRange = x, new CustomRange(20, 100), 4); }