引入单例 从现在开始,关注如何做模块化的问题
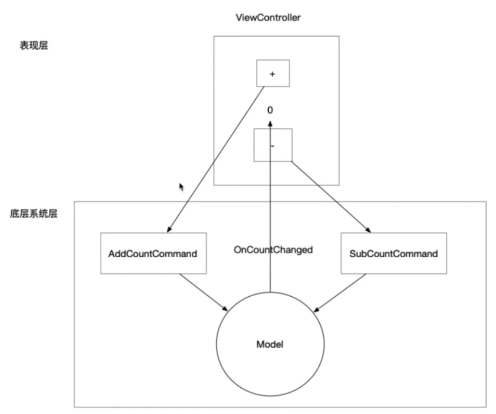
在之前,《点点点》和《CounterApp》都分为表现层和底层系统层。
表现层模块化很容易,根据平台提供的概念即可,比如Unity的Scene或者Prefab,或者由团队和个人自己规定的,登录模块表现层、战斗模块表现层、商店模块表现层等。
系统层的模块化从两个角度去分析:
目前《点点点》和《CounterApp》系统层中需要模块化的部分只有Model部分,Command算作操作,Command可以拓展,但是Command对象被认为是不可以获取的,而Model是共享的,会被很多地方引用。
目前我们的Model内部都是静态的变量,拓展也很方便,但是如果后期加入各种各样的底层模块,都用Static的话,会造成模块之间互相引用关系混乱,类型不清晰等,又让我们重新面临系统架构的基本问题。
现在的问题是:
静态类和静态对象没有访问限制
使用static去拓展模块,其模块识别度不高
我们使用单例,单例类能解决识别度不高的问题,因为一般情况下默认一个单例类是模块,稍微解决一点点静态对象没有访问限制的问题(使用Instance访问)。
首先实现一个泛型单例模板,在Framework文件夹新建Singleton文件夹,新建Singleton脚本:
1
2
3
4
5
6
7
8
9
10
11
12
13
14
15
16
17
18
19
20
21
22
23
24
25
26
27
28
29
using System.Reflection;using System;namespace FrameWorkDesign { public class Singleton <T > where T : Singleton <T > { private static T m_Instance; public static T Instance { get { if (m_Instance == null ) { var type = typeof (T); var ctors = type.GetConstructors(BindingFlags.Instance | BindingFlags.NonPublic); var ctor = Array.Find(ctors, c => c.GetParameters().Length == 0 ); if (ctor == null ) throw new Exception("Non Public Constructor Not Fount in" + type.Name); m_Instance = ctor.Invoke(null ) as T; } return m_Instance; } } } }
然后我们在《点点点》和《CounterApp》中将涉及Model的类都继承泛型单例类,并修改其中的代码
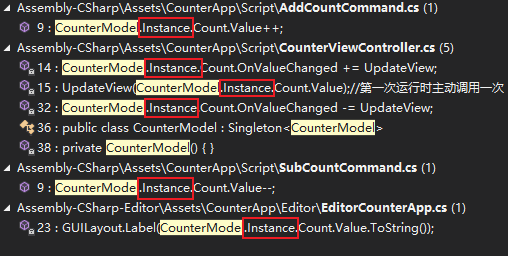
修改《CounterApp》CounterViewController脚本中的CounterModel
1
2
3
4
5
6
7
8
public class CounterModel : Singleton <CounterModel >{ private CounterModel () public BindableProperty<int > Count = new BindableProperty<int >() { Value = 0 }; }
同样修改引用了CounterModel的代码,加上Instance即可(Visual Studio解决方案资源管理器中Editor代码会在另一个Assembly里(Assembly——CSharp——Editor),注意查找)
修改《点点点》GameModel脚本
1
2
3
4
5
6
7
8
9
10
11
namespace FrameWorkDesign.Example { public class GameModel : Singleton <GameModel > { private GameModel () public BindableProperty<int > KillCount = new BindableProperty<int >() { Value = 0 }; public BindableProperty<int > Gold = new BindableProperty<int >() { Value = 0 }; public BindableProperty<int > Score = new BindableProperty<int >() { Value = 0 }; public BindableProperty<int > BestScore = new BindableProperty<int >() { Value = 0 }; } }
《点点点》中GameModel只被KillEnemyCommand引用了,所以修改一下它即可
1
2
3
4
5
6
7
8
9
10
11
12
13
14
namespace FrameWorkDesign.Example { public struct KillEnemyCommand : ICommand { public void Execute () { GameModel.Instance.KillCount.Value++; if (GameModel.Instance.KillCount.Value == 9 ) { GameEndEvent.Trigger(); } } } }
接下来,我们开始准备解决单例没有解决的问题,即静态类或静态对象没有访问限制,或者说单例没有访问限制的问题。
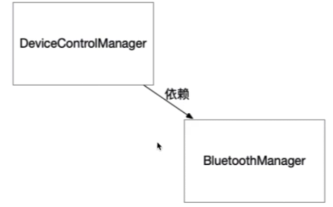
引入IOC容器 为什么单例没有访问限制是个问题呢?假如我们有一个单例类叫做BluetoothManger,另一个单例类叫做DeviceControllManager,而DeviceControllManager在业务中需要依赖BluetoothManger,从高低层关系来讲,DeviceControllManager比BluetoothManger高一个层级。如果单例没有访问限制,其他人不知道DeviceControllManager和BluetoothManger的关系,可能会直接调用BluetoothManger破坏掉BluetoothManager原来的状态(在蓝牙已经连接的情况下再次进行连接),也可能造了一个和DeviceControllManager差不多的轮子造成代码重复等。
IOC容器,可以简单理解为一个字典,这个字典以Type为key,以实例Instance为value。它最少有两个核心API,一个是根据Type注册实例,另一个是根据Type获取实例。
在Framework文件夹内新建IOC文件夹,在其中新建IOCContainer脚本
1
2
3
4
5
6
7
8
9
10
11
12
13
14
15
16
17
18
19
20
21
22
23
24
25
26
27
28
29
30
31
using System.Collections.Generic;using System;namespace FrameWorkDesign { public class IOCContainer { private Dictionary<Type, object > m_Instances = new Dictionary<Type, object >(); public void Rigister <T >(T instance ) { var key = typeof (T); if (m_Instances.ContainsKey(key)) { m_Instances[key] = instance; } else { m_Instances.Add(key, instance); } } public T Get <T >() where T : class { var key = typeof (T); if (m_Instances.TryGetValue(key, out var retInstance)) return retInstance as T; return null ; } } }
我们写一个示例,在FrameworkDesign——Example文件夹中新建IOCExample文件夹,在其中新建一个Scene,命名为IOCExample,再新建一个Script,也叫IOCExample。
1
2
3
4
5
6
7
8
9
10
11
12
13
14
15
16
17
18
19
20
21
22
23
using UnityEngine;namespace FrameWorkDesign.Example { public class IOCExample : MonoBehaviour { void Start () { var contianer = new IOCContainer(); contianer.Rigister(new BluetoothManager()); var bluetoothManager = contianer.Get<BluetoothManager>(); bluetoothManager.Connect(); } public class BluetoothManager { public void Connect () { Debug.Log("Bluetooth has connected" ); } } } }
将这个脚本挂载到场景中的对象上运行即可
《CounterApp》引入IOC容器 在CounterApp——Script文件夹中新建CounterApp脚本,Unity报错先不用管
1
2
3
4
5
6
7
8
9
10
11
12
13
14
15
16
17
18
19
20
21
22
23
24
25
26
27
28
29
30
using FrameWorkDesign;namespace CounterApp { public class CounterApp { private static IOCContainer m_Container; static void MakeSureContainer () { if (m_Container == null ) { m_Container = new IOCContainer(); Init(); } } static void Init () { m_Container.Rigister(new CounterModel()); } public static T Get <T >() where T : class { MakeSureContainer(); return m_Container.Get<T>(); } } }
这时会报错,我们修改CounterModel的代码,弃用Singleton,CounterModel在CounterViewController脚本里
1
2
3
4
5
6
7
public class CounterModel { public BindableProperty<int > Count = new BindableProperty<int >() { Value = 0 }; }
然后修改CounterViewController脚本
1
2
3
4
5
6
7
8
9
10
11
12
13
14
15
16
17
18
19
20
21
22
23
24
25
26
27
28
29
30
31
32
33
34
35
36
37
38
39
40
41
42
43
44
45
using UnityEngine;using UnityEngine.UI;using System;using FrameWorkDesign;namespace CounterApp { public class CounterViewController : MonoBehaviour { private CounterModel m_CounterModel; private void Start () { m_CounterModel = CounterApp.Get<CounterModel>(); m_CounterModel.Count.OnValueChanged += UpdateView; UpdateView(m_CounterModel.Count.Value); transform.Find("Button_add" ).GetComponent<Button>().onClick.AddListener(() => { new AddCountCommand().Execute(); }); transform.Find("Button_sub" ).GetComponent<Button>().onClick.AddListener(() => { new SubCountCommand().Execute(); }); } void UpdateView (int value { transform.Find("Text_Count" ).GetComponent<Text>().text =value .ToString(); } private void OnDestroy () { m_CounterModel.Count.OnValueChanged -= UpdateView; m_CounterModel = null ; } } public class CounterModel { public BindableProperty<int > Count = new BindableProperty<int >() { Value = 0 }; } }
修改AddCountCommand和SubCountCommand脚本,EditorCounterApp脚本可以修改也可以注释掉,这里不列出
1
2
3
4
5
6
7
8
9
10
11
12
using FrameWorkDesign;namespace CounterApp { public struct AddCountCommand : ICommand { public void Execute () { CounterApp.Get<CounterModel>().Count.Value++; } } }
1
2
3
4
5
6
7
8
9
10
11
12
using FrameWorkDesign;namespace CounterApp { public struct SubCountCommand : ICommand { public void Execute () { CounterApp.Get<CounterModel>().Count.Value--; } } }
OK,至此《CounterApp》引入IOC完成
《点点点》引入IOC容器 在FrameworkDesign——Example——Scripts里面新建PointGame脚本
1
2
3
4
5
6
7
8
9
10
11
12
13
14
15
16
17
18
19
20
21
22
23
24
25
26
27
namespace FrameWorkDesign.Example { public class PointGame { private static IOCContainer m_Container; static void MakeSureContainer () { if (m_Container == null ) { m_Container = new IOCContainer(); Init(); } } private static void Init () { m_Container.Rigister(new GameModel()); } public static T Get <T >() where T : class { MakeSureContainer(); return m_Container.Get<T>(); } } }
去掉GameModel里面的私有构造函数,不要再继承Singleton
1
2
3
4
5
6
7
8
9
10
namespace FrameWorkDesign.Example { public class GameModel { public BindableProperty<int > KillCount = new BindableProperty<int >() { Value = 0 }; public BindableProperty<int > Gold = new BindableProperty<int >() { Value = 0 }; public BindableProperty<int > Score = new BindableProperty<int >() { Value = 0 }; public BindableProperty<int > BestScore = new BindableProperty<int >() { Value = 0 }; } }
接下来修改KillEnemyCommand就可以了
1
2
3
4
5
6
7
8
9
10
11
12
13
14
15
namespace FrameWorkDesign.Example { public struct KillEnemyCommand : ICommand { public void Execute () { var gameModel = PointGame.Get<GameModel>(); gameModel.KillCount.Value++; if (gameModel.KillCount.Value == 9 ) { GameEndEvent.Trigger(); } } } }
优化IOC类的重复,使用Architecture 前面引入IOC容器的过程中,可以发现CounterApp脚本和PointGame脚本的内容很多都是重复的,这里我们使用Architecture脚本来解决
在Framework文件夹里新建Architecture文件夹,在其中新建Architecture脚本
1
2
3
4
5
6
7
8
9
10
11
12
13
14
15
16
17
18
19
20
21
22
23
24
25
26
27
28
29
30
31
32
33
namespace FrameWorkDesign { public abstract class Architecture <T > where T : Architecture <T >,new () { private static T m_Architecture; static void MakeSureArchitecture () { if (m_Architecture == null ) { m_Architecture = new T(); m_Architecture.Init(); } } protected abstract void Init () private IOCContainer m_Container = new IOCContainer(); public static T Get <T >() where T : class { MakeSureArchitecture(); return m_Architecture.m_Container.Get<T>(); } public void Register <T >(T instance ) { MakeSureArchitecture(); m_Architecture.m_Container.Rigister<T>(instance); } } }
然后直接修改CounterApp脚本
1
2
3
4
5
6
7
8
9
10
11
12
using FrameWorkDesign;namespace CounterApp { public class CounterApp : Architecture <CounterApp > { protected override void Init () { Register(new CounterModel()); } } }
直接修改PointGame脚本
1
2
3
4
5
6
7
8
9
10
namespace FrameWorkDesign.Example { public class PointGame : Architecture <PointGame > { protected override void Init () { Register(new GameModel()); } } }
IOC比单例的优势 引入IOC依旧比直接使用Singleton麻烦了很多,还要实现一个CounterApp或者PointGame这样的大类,每次从IOC容器里查询字典也造成了性能消耗。
IOC增加了模块访问的限制,解决了单例没有访问限制的问题,一个模块必须从一个Architecture类(CounterApp或者PointGame)获取(Get<T>),在本节的文章中可能体现不出访问限制来,在接下来的文章中便会体现。
还有好处是在Architecture类中注册的各种模块一目了然,省去了使用单例维护“架构草图”的麻烦。
伪代码
1
2
3
4
5
6
7
8
9
10
11
12
13
14
15
namespace FrameWorkDesign.Example { public class PointGame : Architecture <PointGame > { protected override void Init () { Register(new GameModel()); Register(new NetworkModel()); Register(new UIModel()); Register(new InputModel()); Register(new AudioModel()); Register(new RenderModel()); } } }
还有更多好处比如更符合“SOLID”原则、更好的纸上设计体验、可以增加层级、增加中间件模式、增加事件中心等