接口注册模块的使用
在之前的文章中,我们提取出来了新的工具类Architecture,可以看出来IOC容器是一个很方便的模块管理工具
本节中,我们将介绍使用接口来注册模块,以实现SOLID原则中的D,即依赖倒置原则
修改之前写的IOCExample代码
1
2
3
4
5
6
7
8
9
10
11
12
13
14
15
16
17
18
19
20
21
22
23
24
25
26
27
| using UnityEngine;
namespace FrameWorkDesign.Example
{
public class IOCExample : MonoBehaviour
{
void Start()
{
var contianer = new IOCContainer();
contianer.Rigister<IBluetoothManager>(new BluetoothManager());
var bluetoothManager = contianer.Get<IBluetoothManager>();
bluetoothManager.Connect();
}
public interface IBluetoothManager
{
void Connect();
}
public class BluetoothManager : IBluetoothManager
{
public void Connect()
{
Debug.Log("Bluetooth has connected");
}
}
}
}
|
这就是经典的依赖倒置原则(Dependence Inversion Principle)的实现方法之一,即程序要依赖于抽象接口,不要依赖于具体实现。
先简单说一下“抽象-实现”这种形式注册和获取对象的好处
- 接口设计和实现分成两个步骤,接口设计时可以专注于设计,实现时可以专注于实现。
- 接口设计时可以专注于设计可以减少系统设计时的干扰。
- 实现是可以替换的,比如一个接口叫
IStorage,其实可以实现PlayerPrefsStorage、EasySaveStorage、EditorPrefStorage,等切换的时候只需要重新注册一个就可以切换了
- 比较容易测试(单元测试)等
- 当实现细节(比如
PlayerPrefrefs)发生变化时,由于引用的是接口(IStorage),可以降低耦合
我们写一个存储类来举例说明一下这些好处
在FrameworkDesign——Example——IOCExample文件夹内创建一个DIPExample脚本,DIP也就是依赖倒置原则
1
2
3
4
5
6
7
8
9
10
11
12
13
14
15
16
17
18
19
20
21
22
23
24
25
26
27
28
29
30
31
32
33
34
35
36
37
38
39
40
41
42
43
44
45
46
47
48
49
50
51
52
53
54
55
56
57
58
59
60
61
| using System.Collections.Generic;
using UnityEngine;
#if UNITY_EDITOR
using UnityEditor;
#endif
namespace FrameWorkDesign.Example
{
public class DIPExample : MonoBehaviour
{
public interface IStorage
{
void SaveString(string key, string value);
string LoadString(string key, string defaultValue = "");
}
public class PlayerPrefsStorage : IStorage
{
public string LoadString(string key, string defaultValue = "")
{
return PlayerPrefs.GetString(key, defaultValue);
}
public void SaveString(string key, string value)
{
PlayerPrefs.SetString(key, value);
}
}
public class EditorPrefsStorage : IStorage
{
public string LoadString(string key, string defaultValue = "")
{
#if UNITY_EDITOR
return EditorPrefs.GetString(key, defaultValue);
#else
return "";
#endif
}
public void SaveString(string key, string value)
{
#if UNITY_EDITOR
EditorPrefs.SetString(key, value);
#endif
}
}
void Start()
{
var container = new IOCContainer();
container.Rigister<IStorage>(new PlayerPrefsStorage());
var playerPrefsStorage = container.Get<IStorage>();
playerPrefsStorage.SaveString("Name", "WaHaHa");
Debug.Log(playerPrefsStorage.LoadString("Name"));
container.Rigister<IStorage>(new EditorPrefsStorage());
var editorPrefsStorage = container.Get<IStorage>();
Debug.Log(editorPrefsStorage.LoadString("Name"));
}
}
}
|

依赖倒置原则是SOLID原则中的D,单一职责原则是SOLID原则中的S
还剩下:
- 开闭原则(O)
- 里氏替换原则(L)
- 接口分离原则(I)
《CounterApp》支持接口模块
先用接口将应用的Model抽象一层,然后将IOC类(architecture)的注册和获取都改为接口即可
修改《CounterApp》的CounterModel代码,这个代码在CounterViewController脚本里
1
2
3
4
5
6
7
8
9
10
11
| public interface ICounterModel
{
BindableProperty<int> Count { get; }
}
public class CounterModel : ICounterModel
{
public BindableProperty<int> Count { get; } = new BindableProperty<int>()
{
Value = 0
};
}
|
修改CounterApp脚本,以接口的形式注册
1
2
3
4
5
6
7
8
9
10
11
12
| using FrameWorkDesign;
namespace CounterApp
{
public class CounterApp : Architecture<CounterApp>
{
protected override void Init()
{
Register<ICounterModel>(new CounterModel());
}
}
}
|
修改AddCountCommand和SubCountCommand,使用接口获取模块
1
2
3
4
5
6
7
8
9
10
11
12
13
| using FrameWorkDesign;
namespace CounterApp
{
public struct AddCountCommand : ICommand
{
public void Execute()
{
CounterApp.Get<ICounterModel>().Count.Value++;
}
}
}
|
1
2
3
4
5
6
7
8
9
10
11
12
| using FrameWorkDesign;
namespace CounterApp
{
public struct SubCountCommand : ICommand
{
public void Execute()
{
CounterApp.Get<ICounterModel>().Count.Value--;
}
}
}
|
修改CounterViewController脚本,使用接口获取模块
1
2
3
4
5
6
7
8
9
10
11
12
13
14
15
16
17
18
19
20
21
22
23
24
25
26
27
28
29
30
31
32
33
34
35
36
37
38
39
40
41
42
43
44
45
46
47
48
49
| using UnityEngine;
using UnityEngine.UI;
using System;
using FrameWorkDesign;
namespace CounterApp
{
public class CounterViewController : MonoBehaviour
{
private ICounterModel m_CounterModel;
private void Start()
{
m_CounterModel = CounterApp.Get<ICounterModel>();
m_CounterModel.Count.OnValueChanged += UpdateView;
UpdateView(m_CounterModel.Count.Value);
transform.Find("Button_add").GetComponent<Button>().onClick.AddListener(() =>
{
new AddCountCommand().Execute();
});
transform.Find("Button_sub").GetComponent<Button>().onClick.AddListener(() =>
{
new SubCountCommand().Execute();
});
}
void UpdateView(int value)
{
transform.Find("Text_Count").GetComponent<Text>().text =value.ToString();
}
private void OnDestroy()
{
m_CounterModel.Count.OnValueChanged -= UpdateView;
m_CounterModel = null;
}
}
public interface ICounterModel
   {
       BindableProperty<int> Count { get; }
   }
   public class CounterModel : ICounterModel
   {
       public BindableProperty<int> Count { get; } = new BindableProperty<int>()
       {
           Value = 0
       };
   }
}
|
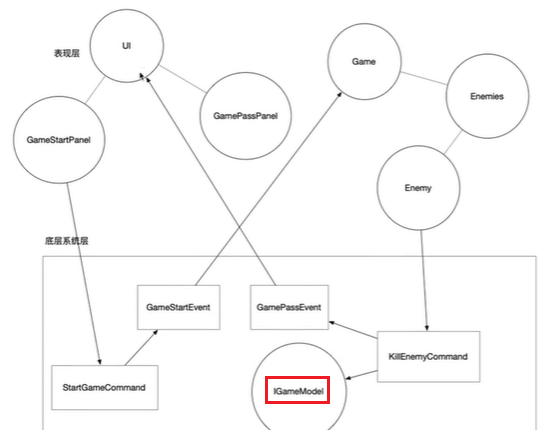
更新一下结构图

《点点点》支持接口模块
修改GameModel脚本,用一个接口把它抽象化
1
2
3
4
5
6
7
8
9
10
11
12
13
14
15
16
17
| namespace FrameWorkDesign.Example
{
public interface IGameModel
{
BindableProperty<int> KillCount { get; }
BindableProperty<int> Gold { get; }
BindableProperty<int> Score { get; }
BindableProperty<int> BestScore { get; }
}
public class GameModel : IGameModel
{
public BindableProperty<int> KillCount { get; } = new BindableProperty<int>() { Value = 0 };
public BindableProperty<int> Gold { get; } = new BindableProperty<int>() { Value = 0 };
public BindableProperty<int> Score { get; } = new BindableProperty<int>() { Value = 0 };
public BindableProperty<int> BestScore { get; } = new BindableProperty<int>() { Value = 0 };
}
}
|
接下来,修改注册模块的PointGame脚本
1
2
3
4
5
6
7
8
9
10
| namespace FrameWorkDesign.Example
{
public class PointGame : Architecture<PointGame>
{
protected override void Init()
{
Register<IGameModel>(new GameModel());
}
}
}
|
然后,修改获取模块的KillEnemyCommand脚本
1
2
3
4
5
6
7
8
9
10
11
12
13
14
15
| namespace FrameWorkDesign.Example
{
public struct KillEnemyCommand : ICommand
{
public void Execute()
{
var gameModel = PointGame.Get<IGameModel>();
gameModel.KillCount.Value++;
if(gameModel.KillCount.Value == 9)
{
GameEndEvent.Trigger();
}
}
}
}
|
更新引用关系图


