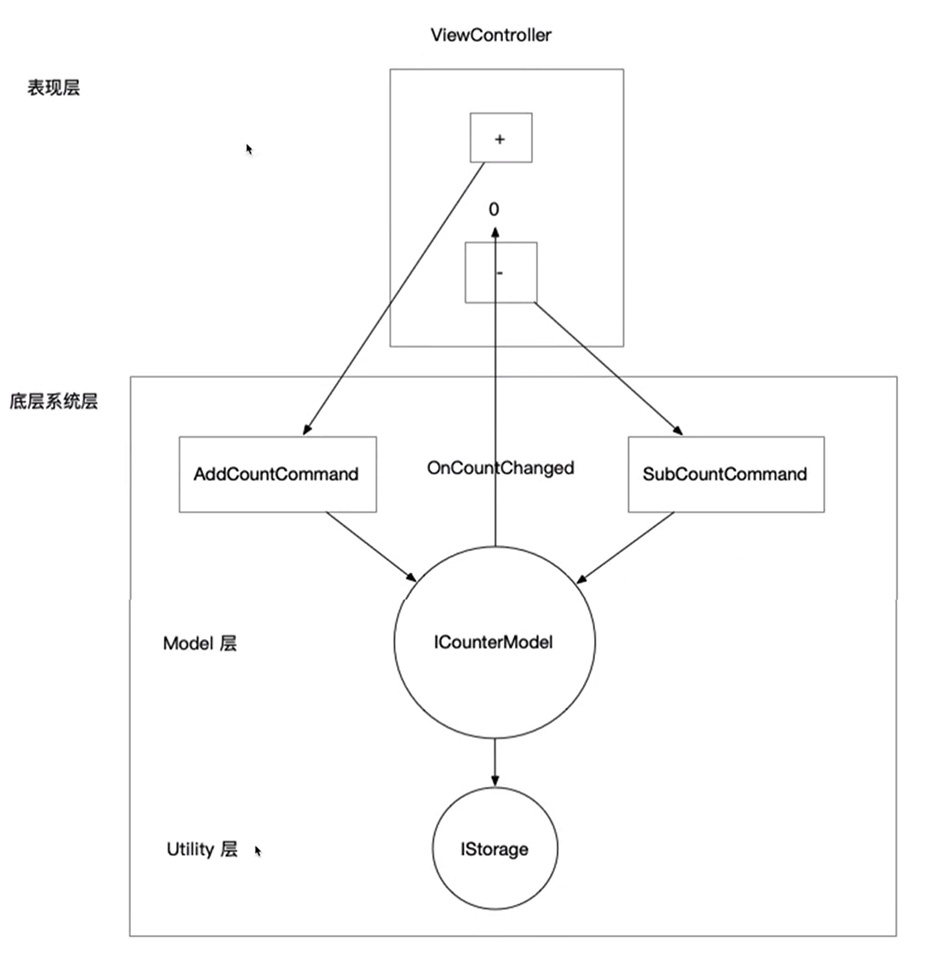
先梳理一下CounterApp的架构草图
目前从这张图中,我们可以将整个App分为三个层级:
表现层:即ViewControllor或者MonoBehaviour脚本等
Model层:管理数据,提供数据的增删改查
Utility层:工具层,提供一些必备的基础工具,比如存储数据、网络连接、蓝牙、序列化反序列化等
目前有三个层级了,而ATAOFramework系统设计架构最终有四个层级,而第四个层级其实叫做System层,即系统层。
架构层级演化回顾 我们先来回顾一下到目前为止架构层级演化的历史
最开始只有表现层代码,即ViewController代码。
然后再多个ViewController可能会出现数据需要共享的情况,所以我们主张数据和表现要分离,所以就单独把数据部分提取了出来,这部分提取出来的代码我们放在了Model层。
而一旦有了Model层,就需要考虑对象之间的交互问题,也就是ViewController对象和Model对象如何交互。此时引入了两个概念,即表现逻辑和交互逻辑,表现逻辑就是:Model——View,交互逻辑就是:View——Model
我们经过比较,发现委托和事件更适合表现逻辑的实现。交互和表现、BindableProperty
在交互逻辑引入了Command,Command可以减少Controller负担,Command也是大多数MVC框架的选择。
引入Command再加上分了Model和ViewController两个层级后,系统的跨平台性提高了很多,我们可以在不用改变底层代码的情况下去把一个App移植到编辑器版本。
Command层不能维护状态 在这个阶段,我们的Command分担了Controller的交互逻辑,当然并不是所有的交互逻辑都适合用Command来分担,还有一部分交互逻辑是需要交给System层来分担的。
首先我们要理解一个事情,即Command是没有状态的,因为Command相当于是一个方法,它只是一次操作,只要调用一次就可以不用了。
有状态的操作也很好理解,比如我们创建一个角色控制脚本,在脚本里创建了一些角色数据,用伪代码表示:
1
2
3
4
5
6
public class PlayerController : MonoBehaviour { public bool Walking; public int JumpCount; public int MaxJumpCount; }
这里面的数据是在游戏运行时一直存在的,需要不断地改查的。
又比如《点点点》中的GameModel和《CounterApp》中的CounterModel,Model代码内的数据也是游戏中需要一直维护的状态。
Command之类的代码重点的特征就是它代表的就是一次操作,即使代码中有数据,也只是临时的数据
1
2
3
4
5
6
7
8
9
10
11
12
13
14
15
public class DoSomethingCommand : ICommand { private readonly int m_Count; public DoSomethingCommand (int count { m_Count = count; } public void Execute () { for (int i = 0 ;i < m_Count;i++) { Debug.Log("DoSomething" ); } } }
就像上面的代码一样,m_Count只是个临时存储用的变量。
我们再看一个例子,比如CounterApp中的AddCountCommand代码:
1
2
3
4
5
6
7
8
9
10
11
using FrameworkDesign;namespace CounterApp { public struct AddCountCommand : ICommand { public void Execute () { CounterApp.Get<ICounterModel>().Count.Value++; } } }
在现实情况下,Command除了更改Model的值,还有可能开启某些服务,而这些服务是有状态的,比如计时服务,或者蓝牙连接服务等。很明显这些服务如果写成对象他们肯定是有状态的对象,这些服务既包含数据,又包含一些对外提供的方法,这些服务归类为Model或者Utility层都是不合适的(Model内部只维护数据,不包含数据的操作;Utility层并不会维护状态),而直接把这些服务的逻辑分散在表现层实现,也会造成大量的重复代码,所以这部分代码我们引入System层来负责。
引入System层伪代码示例 如果我们把蓝牙服务和计时器服务用System层实现的话,那就应该是BluetoothSystem和TimerSystem。
BluetoothSystem伪代码
1
2
3
4
5
6
7
8
9
10
11
12
13
14
15
16
17
18
19
20
21
22
23
24
25
26
27
28
29
public interface IBluetoothSystem : ISystem { bool Connected{get ;set ;} void ConnectCar () void DisconnectCar () } public class BluetoothSystem : IBluetoothSystem { public bool Connected {get ;set ;} private IBLEConnection m_Connection; public void ConnectCar () { var bluetooth = Architecture.GetUtility<IBluetoothUtility>(); m_Connection = bluetooth.Connect("qoskal" ); Connected = true ; } public void DisconnectCar () { var bluetooth = Architecture.GetUtility<IBluetoothUtility>(); if (m_Connection != null ){ m_Connection.Disconnect(); m_Connection = null ; } Connected = false ; } IArchitecture Architecture {get ;set ;} }
以上就是一个蓝牙System层代码,真实代码会更复杂一些,这里仅用来介绍
而在表现层如果想要使用IBluetoothSystem的话,按照惯例,写两个Command:
1
2
3
4
5
6
7
8
9
public class ConnectCarCommand : ICommand { public void Execute () { var bluetoothSystem = Architecture.GetSystem<IBluetoothSystem>(); bluetoothSystem.ConnectCar(); } IArchitecture Architecture {get ;set ;} }
1
2
3
4
5
6
7
8
9
public class DisconnectCarCommand : ICommand { public void Execute () { var bluetoothSystem = Architecture.GetSystem<IBluetoothSystem>(); bluetoothSystem.DisconnectCar(); } IArchitecture Architecture {get ;set ;} }
而如果想监听IBluetoothSystem的连接状态是否变更,则可以让IBluetoothSystem的Connect变量使用BindableProperty
1
2
3
4
5
6
7
8
9
10
11
12
13
14
15
16
17
18
19
20
21
22
23
24
25
26
27
28
29
public interface IBluetoothSystem : ISystem { BindableProperty<bool > Connected {get ;set ;} void ConnectCar () void DisconnectCar () } public class BluetoothSystem : IBluetoothSystem { public BindableProperty<bool > Connected = new BindableProperty<bool >(){ Value = false ;} private IBLEConnection m_Connection; public void ConnectCar () { var bluetooth = Architecture.GetUtility<IBluetoothUtility>(); m_Connection = bluetooth.Connect("qoskal" ); Connected.Value = true ; } public void DisconnectCar () { var bluetooth = Architecture.GetUtility<IBluetoothUtility>(); if (m_Connection != null ){ m_Connection.Disconnect(); m_Connection = null ; } Connected.Value = false ; } IArchitecture Architecture {get ;set ;} }
以上都是一些伪代码,这些代码只是为了说明引入System层是有一些必要的,虽然System层的利用率针对不同项目是不一样的,有的可能利用率更高,有的可能根本用不上,但在ATAOFramework里面是需要提供这么一个层级的。
引入System层以后,当前的架构表现为:
表现层:ViewController或者MonoBehaviour脚本等
System层:系统层,有状态,负责既提供API又有状态的对象,比如网络服务、蓝牙服务、商城系统等
Model层:管理数据,有状态,提供数据的增删改查
Utility层:工具层,无状态,提供一些必备基础工具,比如数据存储、网络链接、蓝牙、序列化反序列化等。
这样,ATAOFramework系统设计架构的四个层级就都接触到了。
表现层——>Command——>改变System、Model层的状态
System层、Modle层——>事件或委托——>通知表现层
表现层——>查询状态——>直接获取System和Model层
表现层测不用访问Utility层。
至此我们也全部接触到了模块化的三种方式:
ATAOFramework系统设计架构将三种模块化方式结合在了一起使用。
实现System层 在FrameworkDesign——Framework——Architecture内新建ISystem脚本
1
2
3
4
5
6
7
namespace FrameWorkDesign { public interface ISystem : IBelongToArchitecture { void Init () } }
目前我们IOCContainer脚本中Register拼写错误,在接下来的代码中修正
像之前支持IModel一样,修改Architecture的代码
1
2
3
4
5
6
7
8
9
10
11
12
13
14
15
16
17
18
19
20
21
22
23
24
25
26
27
28
29
30
31
32
33
34
35
36
37
38
39
40
41
42
43
44
45
46
47
48
49
50
51
52
53
54
using System;using System.Collections;using System.Collections.Generic;using UnityEngine;namespace FrameWorkDesign { public interface IArchitecture { void RegisterSystem <T >(T system ) where T : ISystem } public abstract class Architecture <T > : IArchitecture where T : Architecture <T >,new () { private List<ISystem> m_Systems = new List<ISystem>(); static void MakeSureArchitecture () { if (m_Architecture == null ) { foreach (var architectureSystem in m_Architecture.m_Systems) { architectureSystem.Init(); } m_Architecture.m_Systems.Clear(); m_Architecture.m_Inited = true ; } } public void RegisterSystem <T >(T system ) where T : ISystem { system.Architecture = this ; m_Container.Register<T>(system); if (!m_Inited) { m_Systems.Add(system); } else { system.Init(); } } } }
这里要注意一点,由于Model层是比System层更底层的,所以System层是可以直接访问Model层的,这里要确保Model的初始化是在System层初始化之前进行。
同时,我们还要提供一个能让System层访问Model层的方法,依然在Architecture脚本添加即可
1
2
3
4
5
6
7
8
9
10
11
12
13
14
15
16
17
18
19
20
21
22
23
24
using System;using System.Collections;using System.Collections.Generic;using UnityEngine;namespace FrameWorkDesign { public interface IArchitecture { T GetModel <T >() where T : class , IModel ; } public abstract class Architecture <T > : IArchitecture where T : Architecture <T >,new () { public T GetModel <T >() where T : class , IModel { return m_Container.Get<T>(); } } }
CounterApp简单成就系统 接下来我们实践一下System层,我们尝试在CounterApp中实现一个简单的成就系统,在CounterApp——Scripts文件夹中新建脚本命名为AchievementSystem
1
2
3
4
5
6
7
8
9
10
11
12
13
14
15
16
17
18
19
20
21
22
23
24
25
26
27
28
29
30
31
32
33
34
35
using UnityEngine;using FrameWorkDesign;namespace CounterApp { public interface IAchievementSystem : ISystem { } public class AchievementSystem : IAchievementSystem { public IArchitecture Architecture { get ; set ; } public void Init () { var counterModel = Architecture.GetModel<ICounterModel>(); var previousCount = counterModel.Count.Value; counterModel.Count.OnValueChanged += newCount => { if (previousCount<10 && newCount >= 10 ) { Debug.Log("点击10次" ); }else if (previousCount < 20 && newCount >= 20 ) { Debug.Log("点击20次" ); } previousCount = newCount; }; } } }
然后别忘了在CounterApp中注册进去
1
2
3
4
5
6
7
8
9
10
11
12
13
14
using FrameWorkDesign;namespace CounterApp { public class CounterApp : Architecture <CounterApp > { protected override void Init () { RegisterSystem<IAchievementSystem>(new AchievementSystem()); RegisterModel<ICounterModel>(new CounterModel()); RegisterUtility<IStorage>(new PlayerPrefsStorage()); } } }
这个成就系统仅仅作为演示,实际使用中需要再声明一些布尔变量,这些变量用于记录某个成就是否已经触发过了,并且将它存储起来,防止重复触发成就,目前的条件判断是很有局限的(例:if(previousCount<10 && newCount >= 10 && !isCount10))