Action是AC的核心。Action被设计用来执行特定的任务,ActionList中链接在一起的Actions可以在游戏中形成Cutscenes、Interactions和任何logic sequence。
虽然Adventure Creator包含50多个“官方”Action,但可以通过编写自定义Action进一步扩展工具包,当我们需要执行传统冒险范围之外的任务时,自定义Action非常有用。
在本教程中,我们将编写一个Action,可以对任何游戏对象的刚体组件启用或禁用重力。请注意,本教程不是脚本编写指南:只是关于编写AdventureCreator可以使用的自定义代码的教程。
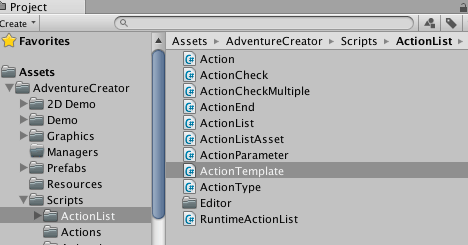
Action Template 每个Action都包含在它自己的脚本文件中。我们可以使用包含的模板文件作为基础,而不是从头开始编写新脚本。在Assets文件夹中,可以找到脚本ActionTemplate.cs,位于AdventureCreator/Scripts/ActionList中。
1 2 3 4 5 6 7 8 9 10 11 12 13 14 15 16 17 18 19 20 21 22 23 24 25 26 27 28 29 30 31 32 33 34 35 36 37 38 39 40 41 42 43 44 45 46 47 48 49 50 51 52 53 54 55 56 57 58 59 60 61 62 63 64 65 66 67 68 69 70 71 72 73 74 75 76 77 78 79 80 81 82 83 84 85 86 87 88 89 90 91 92 using UnityEngine;using System.Collections.Generic;#if UNITY_EDITOR using UnityEditor;#endif namespace AC { [System.Serializable ] public class ActionTemplate : Action { public override ActionCategory Category { get { return ActionCategory.Custom; }} public override string Title { get { return "Template" ; }} public override string Description { get { return "This is a blank Action template." ; }} public override float Run () { if (!isRunning) { isRunning = true ; return defaultPauseTime; } else { isRunning = false ; return 0f ; } } public override void Skip () { Run (); } #if UNITY_EDITOR public override void ShowGUI () { } public override string SetLabel () { return string .Empty; } #endif } }
创建ActionGravity 复制这个脚本文件,并重命名为ActionGravity。并在Assets内新建一个文件夹My Custom Actions,将ActionGravity放入此文件夹中。先忽略Console窗口的报错,我们一旦编辑此脚本报错就会消失。
打开这个脚本。修改它的类名为ActionGravity
1 2 3 4 5 6 7 8 [System.Serializable ] public ActionGravity : Action{ public override ActionCategory Category { get { return ActionCategory.Custom; }} public override string Title { get { return "Template" ; }} public override string Description { get { return "This is a blank Action template." ; }}
我们可以修改属性来创建我们的category,title和description。
1
2
3
public override ActionCategory Category { get { return ActionCategory.Object; }}public override string Title { get { return "Change gravity" ; }}public override string Description { get { return "Enables or disables a Rigidbody's gravity checkbox." ; }}
我们给这个Action两个Field,一个是用来设置的GameObject,一个是开关Gravity的bool
1 2 3 public GameObject objectToAffect;public bool newGravityState;
Action的GUI是在ShowGUI方法中编写的,在其中添加如下代码来让上面的两个变量在编辑器中显示出来:
1
2
3
4
5
6
public override void ShowGUI (){ objectToAffect = (GameObject)EditorGUILayout.ObjectField("GameObject to affect:" , objectToAffect, typeof (GameObject), true ); newGravityState = EditorGUILayout.Toggle("New gravity state:" , newGravityState); }
ShowGUI和SetLabel方法只能够写在UNITY_EDITOR预定义指令里。如果没有,你在构建游戏时会遇到麻烦。这些在ActionTemplate模板文件中已经是正确的,但如果从头开始编写Action,则需要添加预定义指令:
1 2 3 4 5 #if UNITY_EDITOR #endif
最后,我们将编写在Action运行时执行重力变化的代码。这是在Run函数中完成的。此函数返回一个浮点值,它将告诉AdventureCreator在发生其他任何事情之前要等待多长时间。如果返回零,系统将继续运行。由于ActionGravity将进行即时更改,因此我们返回0就可以了。
1
2
3
4
5
6
7
8
9
10
11
12
13
14
15
16
17
18
public override float Run (){ if (objectToAffect && objectToAffect.GetComponent<Rigidbody>()) { objectToAffect.GetComponent<Rigidbody>().useGravity = newGravityState; } if (!isRunning) { isRunning = true ; return defaultPauseTime; } else { isRunning = false ; return 0f ; } }
加入ActionManager 我们的自定义Action现在可以和其他Action一起加入Adventure Creator。在Game Editor窗口中,找到Actions Manager。
我们需要告诉系统自定义Action的存储位置。在“Custom Action scripts”面板下,单击右侧的文件夹图标:
导航到自定义Action的目录,然后单击选择。现在,您应该可以看到您的自定义Action列在“Object”类别中:
现在Action在ActionLists中可用