Adventure Creator内置了对音量和字幕开关等基本选项的支持。然而,在为PC和Mac构建游戏时,可能需要添加更多选项,尤其是图形选项。

在这个高级教程中,我们将添加更改屏幕分辨率的功能,在游戏中作为一个自定义选项。我们将使用菜单、变量以及一些脚本。脚本编写将是非常基本的,但仍建议您事先掌握编码原则的基本知识,尽管完整的脚本仍全部展示出来。

可能的分辨率取决于用户的显示器。Unity在其Screen.resolutions中存储了可用选项的数组。

我们将使用一个整型变量来存储上述数组的当前索引。这将是一个全局变量,因此可以随时访问。
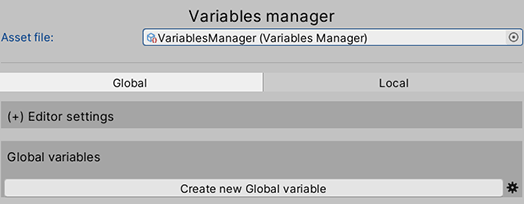
创建Global Variable

首先转到Variables Manager,并添加一个新的Global Variable

Variables Manager

命名为ScreenResolution,Type设置为Integer,Initial Value为-1。如果发现它为负值,我们可以稍后编写脚本将其设置为正确的值。最后将Link to设置为Options Data。这将使其值在应用程序重新启动后仍然有效,并与保存的游戏文件分开。

ScreenResolution设置

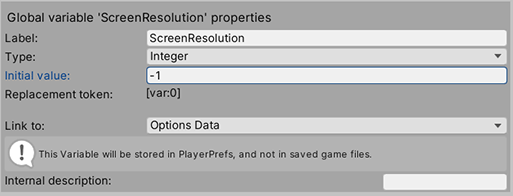
记下变量的ID号,因为我们在编写脚本时需要它。ID编号列在列表中其名称的左侧。

增加分辨率选项菜单

现在,我们准备修改选项菜单,以包含分辨率选项。本教程假设您已经有一个要使用的选项菜单-如果没有,您可以从Default_MenuManager资源文件中复制一个,如下所示:

默认选项菜单

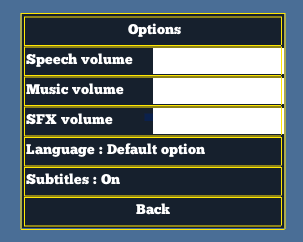
打开Menu Manager并选择Option菜单。在elements列表下,选择element type为Cycle,然后单击Add new。

添加Cycle

Cycle element将允许玩家在多个值之间进行选择,在本例中是各种分辨率。将其重命名为ScreenResolutionCycle,并重新设置其样式,使其与菜单的其余部分相匹配:(将这个element在列表中Move Up一下就能调换位置了,最后将element的size设为Manual:W:36,H:5)

重新设置样式

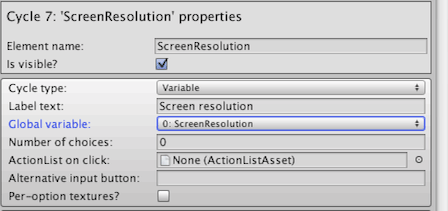
Cycle的值将链接到我们之前创建的Variable,因此将Cycle类型设置为Variable并选择ScreenResolution变量。

设置Cycle type

设置脚本

接下来,element的property为我们提供了空间,可以输入玩家可以循环使用的许多不同选项。然而,由于可用的分辨率会因玩家的显示设备而异,因此我们需要在运行时通过脚本设置这些值。

我们可以通过右键单击任何Manager字段的标签来获取该字段的API引用。将Number of choices设为1,并右键单击Choice #0字段标签以获得其API引用:

1
(AC.PlayerMenus.GetElementWithName ("Options", "ScreenResolutionCycle") as AC.MenuCycle).optionsArray[0]

我们可以使用这个,以及Unity的Screen.resolutions数组,编写相应生成选项标签的函数:

1
2
3
4
5
6
7
8
9
10
11
void GenerateResolutionCycleOptions ()
{
AC.MenuCycle resolutionCycle = AC.PlayerMenus.GetElementWithName ("Options", "ScreenResolutionCycle") as AC.MenuCycle;

resolutionCycle.optionsArray.Clear ();
foreach (Resolution resolution in Screen.resolutions)
{
string optionLabel = resolution.width.ToString () + " x " + resolution.height.ToString () + " (" + resolution.refreshRate.ToString () + ")";
resolutionCycle.optionsArray.Add (optionLabel);
}
}

我们还需要一个函数来设置ScreenResolution整数变量的正确值(如果发现它是-1):

1
2
3
4
5
6
7
8
9
10
11
12
13
14
15
16
17
18
void InitResolutionVariable ()
{
GVar variable = GlobalVariables.GetVariable (0); // Replace '0' with your own variable's ID number
if (variable.IntegerValue == -1)
{
for (int i=0; i<Screen.resolutions.Length; i++)
{
if (Screen.resolutions[i].width == Screen.currentResolution.width &&
Screen.resolutions[i].height == Screen.currentResolution.height &&
Screen.resolutions[i].refreshRate == Screen.currentResolution.refreshRate)
{
variable.IntegerValue = i;
return;
}
}
variable.IntegerValue = 0;
}
}

一旦AC初始化,这两个函数最好在游戏开始时调用。在Project窗口中,创建一个名为SetupOptionsMenu.cs的新C#脚本,并给出以下内容:

1
2
3
4
5
6
7
8
9
10
11
12
13
14
15
16
17
18
19
20
21
22
23
24
25
26
27
28
29
30
31
32
33
34
35
36
37
38
39
40
41
42
43
44
using UnityEngine;
using AC;

public class SetupOptionsMenu : MonoBehaviour
{

void Start ()
{
GenerateResolutionCycleOptions ();
InitResolutionVariable ();
}

void GenerateResolutionCycleOptions ()
{
MenuCycle resolutionCycle = PlayerMenus.GetElementWithName ("Options", "ScreenResolutionCycle") as AC.MenuCycle;

resolutionCycle.optionsArray.Clear ();
foreach (Resolution resolution in Screen.resolutions)
{
string optionLabel = resolution.width.ToString () + " x " + resolution.height.ToString () + " (" + resolution.refreshRate.ToString () + ")";
resolutionCycle.optionsArray.Add (optionLabel);
}
}

void InitResolutionVariable ()
{
GVar variable = GlobalVariables.GetVariable (0); // Replace '0' with your own variable's ID number
if (variable.IntegerValue == -1)
{
for (int i=0; i<Screen.resolutions.Length; i++)
{
if (Screen.resolutions[i].width == Screen.currentResolution.width &&
Screen.resolutions[i].height == Screen.currentResolution.height &&
Screen.resolutions[i].refreshRate == Screen.currentResolution.refreshRate)
{
variable.IntegerValue = i;
return;
}
}
variable.IntegerValue = 0;
}
}

}

将其放置在游戏第一个场景中的空游戏对象上。如果您现在测试游戏并打开选项菜单,您会发现循环元素设置为游戏的当前分辨率,并且您可以单击显示器的每个可用分辨率。由于变量链接到Options Data,因此即使在退出并重新玩游戏后,也会记住更改。

创建自定义Action

然而,单击Cycle将不会影响实际的分辨率-要改变这一点,我们必须创建一个自定义Action。

Assets / AdventureCreator / Scripts / ActionList 文件夹内复制 ActionTemplate.cs,命名为ActionApplyResolution,并将其移动到新的文件夹中。

先修改类名

1
2
3
[System.Serializable]
public class ActionApplyResolution: Action
{

修改属性

1
2
3
public override ActionCategory Category { get { return ActionCategory.Engine; }}
public override string Title { get { return "Apply resolution"; }}
public override string Description { get { return "Apply new resolution by device"; }}

这个Action非常简单,不会涉及任何要更改的设置,也不会涉及任何编辑器中的GUI元素,因此我们只需要在Run()函数中编写代码即可。

当这个Action运行时,我们想读取ScreenResolution全局变量的值,并相应地设置游戏的分辨率。因此,首先,我们将定义一个新的整数chosenIndex,并将其设置为全局变量的当前值。然后,我们需要重新计算菜单以反映更新,然后返回一个浮点值零,表示操作完成。

Run()函数替换为以下内容:

1
2
3
4
5
6
7
8
9
10
11
12
13
14
15
16
17
18
19
20
21
22
public override float Run ()
{
int chosenIndex = GlobalVariables.GetIntegerValue(0);

if (chosenIndex >= 0)
{
Resolution chosenResolution = Screen.resolutions[chosenIndex];
Screen.SetResolution(chosenResolution.width, chosenResolution.height, Screen.fullScreen);
KickStarter.playerMenus.RecalculateAll();
}

if (!isRunning)
{
isRunning = true;
return defaultPauseTime;
}
else
{
isRunning = false;
return 0f;
}
}

我们的Action现在已经完成了——我们现在只需要将它插入Actions Manager,以便在ActionLists中使用它。将文件移动到资源目录中的新文件夹,然后转到Actions Manager。在“Custom Action scripts”面板中,单击文件夹图标并将窗口指向存储新Action的目录。确保该目录只包含Action脚本。然后,您会发现新的Action与其他Action一起列出。

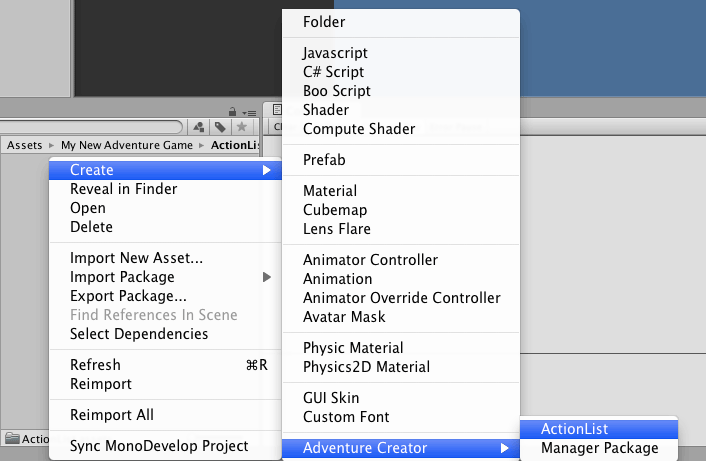
现在,当玩家点击Cycle element时,我们就可以调用这个Action了。我们将把它放在一个ActionList Asset资源中,该资源可以在任何场景中调用。在“Project”窗口中选择适当的文件夹,然后选择“Create”→ Adventure Creator→ ActionList资产。

创建ActionList资产

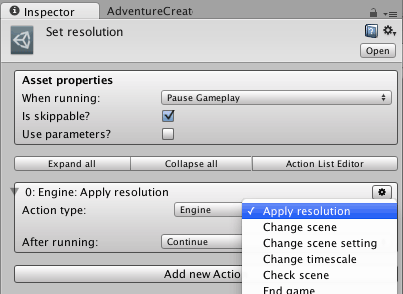
将此资源重命名为“Set resolution”,并在“Inspector”窗口中查看。单击Add new Action一次以创建新Action,并将Action类型设置为Engine:Apply resolution。

设置Action

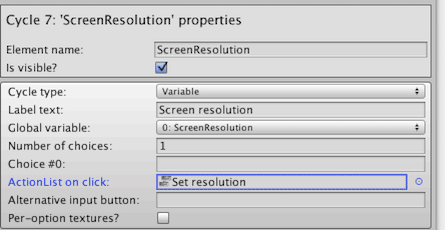
现在返回Menu Manager,选择ScreenResolution Cycle element,并将Set resolution ActionList指定为ActionList on click。

设定要运行的ActionList

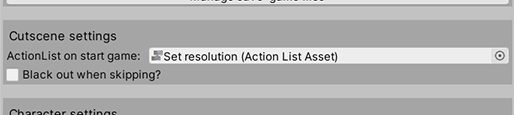
现在,当点击Cycle时,屏幕将自动设置为玩家选择的分辨率。我们现在只需要确保游戏在重新开始时保持这个分辨率。我们可以在开始游戏时将“Set resolution”资源设置为游戏的ActionList,如“Setting Manager”中所列:

设置重开时保持分辨率