Protocol和TCP/IP
TCP/IP定义的是传输方式
Protocol定义的是传输数据的具体内容,如“请求登录”、“请求改名”等
运行PESocket控制台示例
需要先在“解决方案——Protocol——NetMsg.cs”中修改为计算机本地网路地址:
1
2
3
4
5
6
7
8
9
10
11
12
13
14
15
| using System;
using PENet;
namespace Protocol {
[Serializable]
public class NetMsg : PEMsg {
public string text;
}
public class IPCfg {
public const string srvIP = "127.0.0.1";
public const int srvPort = 17666;
}
}
|
VS中生成dll的方法
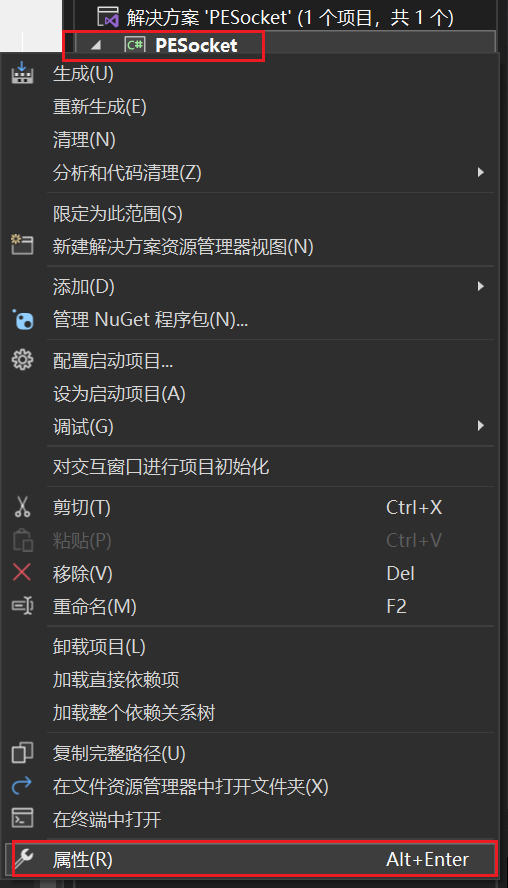
- 首先打开PESocket的sln,然后在解决方案资源管理器中选中“PESocket”库右键——点击属性
- 我们先修改应用程序的目标框架为“.Net Framework 4.7.2”,然后在面板中点击“生成”——在最下方定义一个输出路径,输出到自定义的一个文件夹当中

- 在标题栏中点击“生成——重新生成解决方案”
- 在指定的文件夹中就会出现“PESocket.dll”文件了。
自定义Server工程
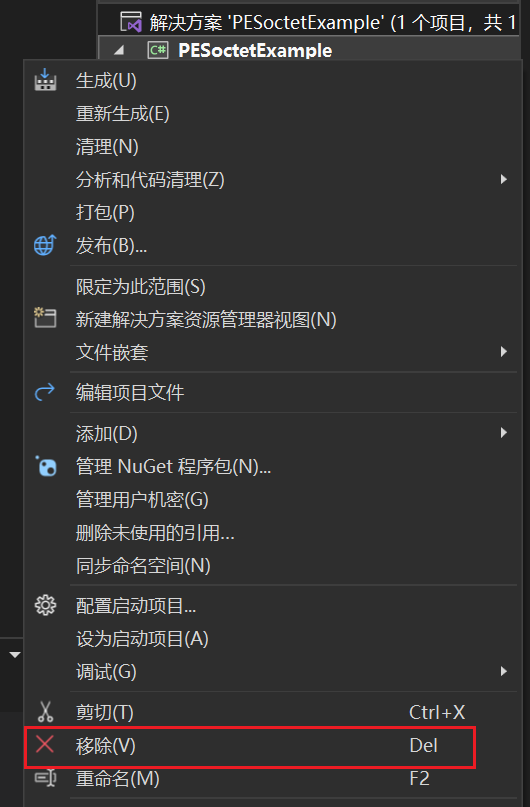
先在Visual Studio中新建新的**.Net Framework控制台**应用项目,命名为“PESocketExample”
将项目默认生成的类库移除
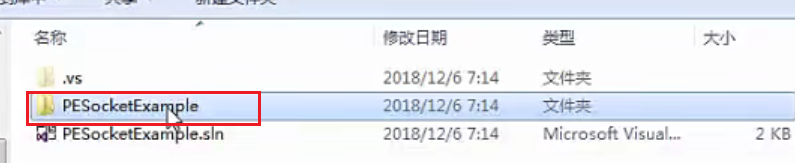
进入项目所在的文件夹,删除工程文件夹,只保留解决方案
我们选中空的解决方案,右键点击添加新的控制台项目,命名为“Server”,目前选择的是4.7.2 Framework版本
修改服务器入口类名,注意解决方案内的名称也要修改
1
2
3
4
5
6
7
8
9
| namespace Server
{
internal class ServerStart
{
static void Main(string[] args)
{
}
}
}
|
接下来我们需要创建通信内容协议,我们再次选中解决方案,右键点击添加类库,我们选择DotNet Framework的类库,并选择4.7.2版本,命名为Protocol,并在资源管理器面板里面把自动生成的“Class1”重命名为“NetMsg”,Protocol类库的样子:
1
2
3
4
5
6
| namespace Protocol
{
public class NetMsg
{
}
}
|
这个协议需要继承PESocket内的主类才能发挥作用。
我们在Protocol的资源管理器面板的“引用”上右键——添加项目引用,在弹出的窗口中点击浏览,找到上面我们生成的PESocket.dll的位置,确定添加上,同时,我们也要删除其他的引用
作为内容协议,Protocol内部需要一些变量来储存内容,我们这里声明一个string变量,同时Protocol的类是需要转化为二进制传输的,所以我们需要添加System.Serializable特性
1
2
3
4
5
6
7
8
9
10
| using PENet;
namespace Protocol
{
[System.Serializable ]
public class NetMsg:PEMsg
{
public string text;
}
}
|
接下来我们回到Server,Server也需要获取到Protocol,像之前一样,我们在先把PESocket.dll引用进来,然后还需要把Protocol项目也引用进来。
再回到Protocol,我们在其中定义一个新的类,用来声明服务器IP的接口配置:
1
2
3
4
5
6
7
8
9
10
11
12
13
14
15
| using PENet;
namespace Protocol
{
[System.Serializable ]
public class NetMsg:PEMsg
{
public string text;
}
public class IPCfg
{
public const string srvIP = "127.0.0.1";
public const int srvPort = 17666;
}
}
|
回到Server项目,在其中添加一个新的类,命名为“ServerSession”:
1
2
3
4
5
6
7
8
9
10
11
12
13
14
15
16
17
18
| using PENet;
using Protocol;
public class ServerSession : PESession<NetMsg>
{
protected override void OnConnected()
{
PETool.LogMsg("Client Connected");
}
protected override void OnReciveMsg(NetMsg msg)
{
PETool.LogMsg("Client Req:" + msg.text);
}
protected override void OnDisConnected()
{
PETool.LogMsg("Client DisConnected");
}
}
|
Session类负责与客户端连接,当与客户端建立连接时,会有一个反馈;当收到客户端消息时,要对数据进行处理;当与客户端断开时,要输出断开日志。
进入ServerStart类,我们需要在这里开启服务器:
1
2
3
4
5
6
7
8
9
10
11
12
13
14
15
16
17
18
19
| using PENet;
using Protocol;
namespace Server
{
internal class ServerStart
{
static void Main(string[] args)
{
PESocket<ServerSession, NetMsg> server = new PESocket<ServerSession, NetMsg>();
server.StartAsServer(IPCfg.srvIP, IPCfg.srvPort);
while (true)
{
}
}
}
}
|
自定义Unity工程
先把上一节的Protocol项目导出为dll,Protocol定义了服务器的端口信息和传输内容信息,这些也需要在客户端使用,当然,客户端也可以用别的方式获取Protocol内容协议,在这里我们直接使用dll。
新建一个Unity项目,在Unity里面引入Protocol.dll和PESocket.dll。
新建一个ClientSession脚本,用来建立连接与处理数据
1
2
3
4
5
6
7
8
9
10
11
12
13
14
15
16
17
18
| using Protocol;
using UnityEngine;
public class ClientSession : PENet.PESession<NetMsg>
{
protected override void OnConnected()
{
Debug.Log("Server Connected");
}
protected override void OnReciveMsg(NetMsg msg)
{
Debug.Log("Server Rsp:" + msg.text);
}
protected override void OnDisConnected()
{
Debug.Log("Server DisConnected");
}
}
|
新建一个GameStart脚本,用来开启与服务器的连接
1
2
3
4
5
6
7
8
9
10
11
12
13
14
15
16
17
| using UnityEngine;
using PENet;
using Protocol;
public class GameStart : MonoBehaviour
{
PENet.PESocket<ClientSession,NetMsg> client;
private void Start(){
client = new PENet.PESocket<ClientSession,NetMsg>();
client.StartAdClient(IPCfg.srvIP,IPCfg.srvPort);
}
private void Update(){
client.session.SendMsg(new NetMsg{
text = "hello Unity"
});
}
}
|
我们先打开Server控制台程序,再启动Unity,按下空格键,服务器控制台就会显示:
1
2
| Client Connect
Client Req:hello Unity
|
我们修改一下服务器端的代码,让Unity客户端得到服务器的回应
1
2
3
4
5
6
7
8
9
10
11
12
13
14
15
16
17
18
19
20
21
22
23
24
25
26
27
| using PENet;
using Protocol;
public class ServerSession : PESession<NetMsg>
{
protected override void OnConnected()
{
PETool.LogMsg("Client Connected");
SendMsg(new NetMsg
{
text = "Welcom to connect"
});
}
protected override void OnReciveMsg(NetMsg msg)
{
PETool.LogMsg("Client Req:" + msg.text);
SendMsg(new NetMsg
{
text = "SrvRsp:" + msg.text,
});
}
protected override void OnDisConnected()
{
PETool.LogMsg("Client DisConnected");
}
}
|
Unity客户端不能使用Console来输出Log信息,为了在客户端中能够查看PESocket的log信息,我们需要在开始客户端服务的时候设定log
修改GameStart脚本
1
2
3
4
5
6
7
8
9
10
11
12
13
14
15
16
17
18
19
20
21
22
23
24
25
26
27
28
29
30
31
32
33
34
35
36
37
38
39
| using UnityEngine;
using PENet;
using Protocol;
public class GameStart : MonoBehaviour
{
PENet.PESocket<ClientSession,NetMsg> client;
private void Start(){
client = new PENet.PESocket<ClientSession,NetMsg>();
client.StartAdClient(IPCfg.srvIP,IPCfg.srvPort);
client.SetLog(true,(string msg,int lv) => {
switch(lv)
{
case 0:
msg = "Log:" + msg;
Debug.Log(msg);
break;
case 1:
msg = "Warn:" + msg;
Debug.LogWarning(msg);
break;
case 2:
msg = "Error:" + msg;
Debug.LogError(msg);
break;
case 3:
msg = "Info:" + msg;
Debug.Log(msg);
break;
}
});
}
private void Update(){
client.session.SendMsg(new NetMsg{
text = "hello Unity"
});
}
}
|