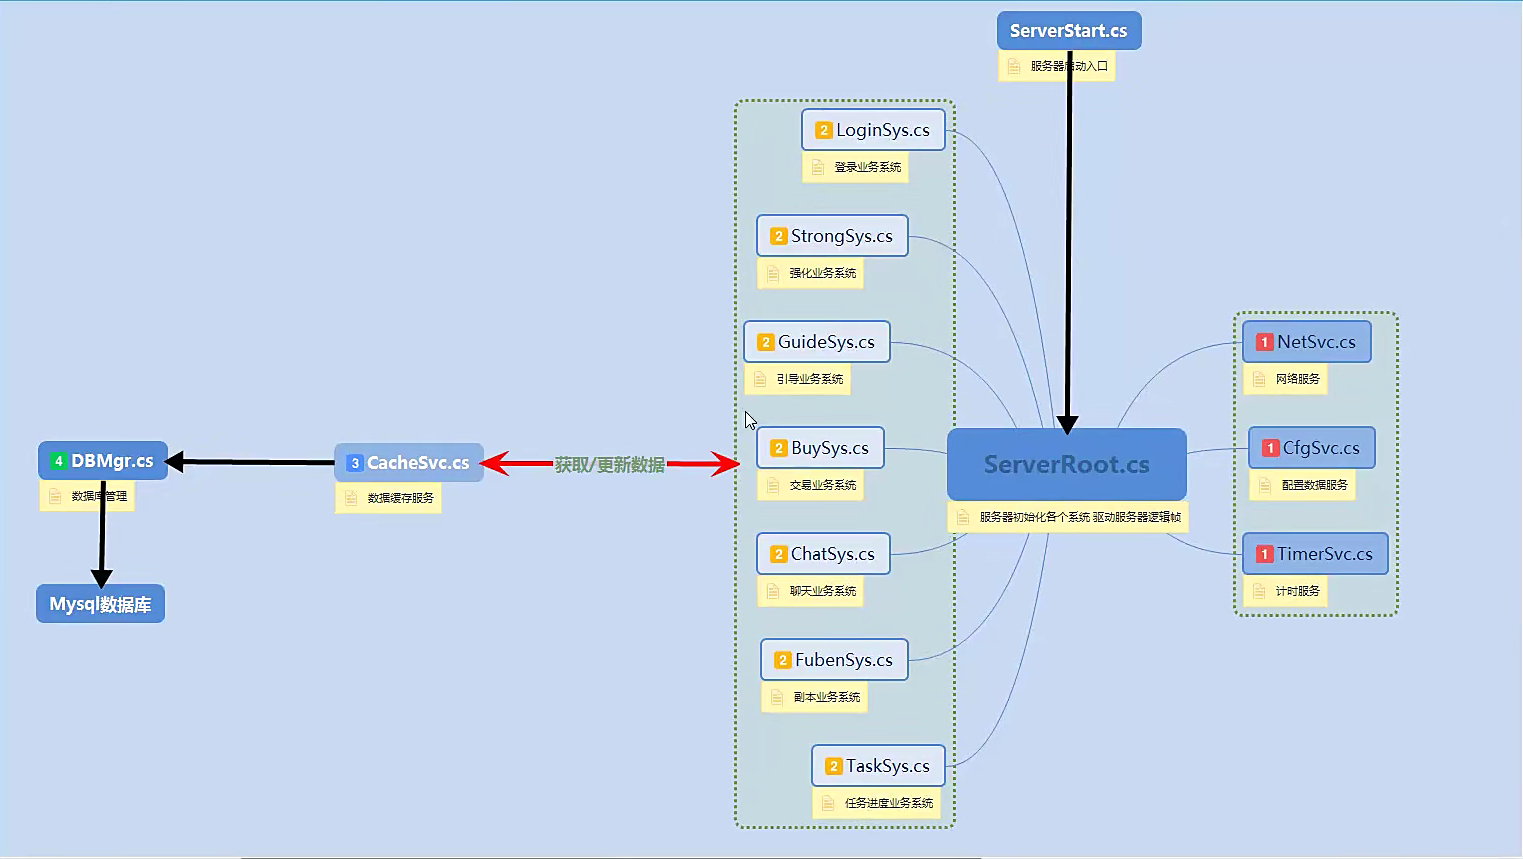
服务器框架 教程中使用的是单服服务器。
分为四层:
通用服务层——NetSvc、CfgSvc、TimerSvc。CfgSvc类似客户端的资源服务,只不过服务器没有那么多资源要求,所以只处理配置数据
各系统层——LoginSys等,服务器系统层比较细分,由于服务器没有UI要求,代码量也较低
缓存层——CacheSvc,各系统层直接跟缓存层打交道,缓存就是将数据库中的部分数据先缓存在内存中,玩家上线时读入缓存,下线时写入数据库
数据库层——DBMgr
缓存层和数据库层是作为服务器特有的功能。
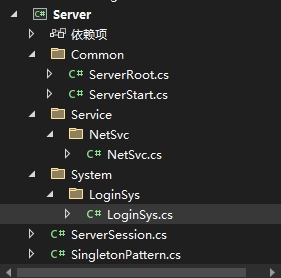
服务器启动逻辑 我们用之前的“PESocketExample”项目来制作我们的游戏服务器,这一节完成后的资源管理器界面如下:
整个服务器项目也比较依赖单例,我们先新建一个单例模板SingletonPattern
1
2
3
4
5
6
7
8
9
10
11
12
13
public class SingletonPattern <T > where T : class ,new (){ private static T instance; public static T Instance { get { if (instance == null ) instance = new T(); return instance; } } }
新建Common文件夹,修改ServerStart
1
2
3
4
5
6
7
8
9
10
11
12
13
14
15
16
using PENet;using Protocol;public class ServerStart { static void Main (string [] args { ServerRoot.Instance.Init(); while (true ) { } } }
新建ServerRoot
1
2
3
4
5
6
7
8
9
10
11
12
13
public class ServerRoot : SingletonPattern <ServerRoot >{ public void Init () { NetSvc.Instance.Init(); LoginSys.Instance.Init(); } }
在Service——NetSvc文件夹中新建NetSvc:
1
2
3
4
5
6
7
public class NetSvc : SingletonPattern <NetSvc >{ public void Init () { } }
在System——LoginSys文件夹中新建LoginSys:
1
2
3
4
5
6
7
public class LoginSys : SingletonPattern <LoginSys >{ public void Init () { } }
服务器网络服务 我们在“PESocketExample”项目里再重新添加一个类库,命名为“PEProtocol”,使用4.7.2框架,创建完成后删除掉所有的自动引用。
然后进入“PESocketExample”项目的文件夹,新建一个Libs文件夹,把之前创建的PESocket.dll复制过来放进这个文件夹里,然后让PEProtocol和Server项目重新引用PESocket.dll,并且让Server项目再引用PEProtocol项目
修改PEProtocol类库的第一个默认cs文件,重命名为GameMsg:
1
2
3
4
5
6
7
8
9
10
11
12
13
namespace PEProtocol { [System.Serializable ] public class GameMsg : PENet.PEMsg { public string text; } public class SrvCfg { public const string srvIP = "127.0.0.1" ; public const int srvPort = 17666 ; } }
将之前的ServerSession文件拖拽到NetSvc文件夹下,修改文件中的引用
1
2
3
4
5
6
7
8
9
10
11
12
13
14
15
16
17
18
19
20
21
22
23
24
25
26
27
using PENet;using PEProtocol;public class ServerSession : PESession <GameMsg >{ protected override void OnConnected () { PETool.LogMsg("Client Connected" ); SendMsg(new GameMsg { text = "Welcom to connect" }); } protected override void OnReciveMsg (GameMsg msg ) { PETool.LogMsg("Client Req:" + msg.text); SendMsg(new GameMsg { text = "SrvRsp:" + msg.text, }); } protected override void OnDisConnected () { PETool.LogMsg("Client DisConnected" ); } }
这次我们的PESocket需要从NetSvc开启,因为Socket仅属于服务器框架的网络服务层
1
2
3
4
5
6
7
8
9
10
11
12
13
using PENet;using PEProtocol;public class NetSvc : SingletonPattern <NetSvc >{ public void Init () { PESocket<ServerSession, GameMsg> server = new PESocket<ServerSession, GameMsg>(); server.StartAsServer(SrvCfg.srvIP,SrvCfg.srvPort); PETool.LogMsg("NetSvc Init Done" ); } }
客户端网络服务 我们将上面的服务器Protocol协议接口(也就是dll)的生成路径,放在Unity的工程文件夹下,这样对于dll的开发都能跟Unity同步。
在Unity——Assets文件夹下新建Plugins——Nets文件夹,将PEProtocol类库的生成路径指定在这个文件夹里,然后“右键——生成”。
生成后PESocket和PEProtocol都会出现在Plugins——Nets文件夹里,因为PEProtocol是引用PESocket的。
注意这个时候Server工程可能会报错,需要让它重新引用一下PEProtocol项目。
在Assets——Scripts——Service文件夹中新建ClientSession脚本:
1
2
3
4
5
6
7
8
9
10
11
12
13
14
15
16
17
18
19
using PENet;using PEProtocol;using UnityEngine;public class ClientSession :PESession <GameMsg >{ protected override void OnConnected () { Debug.Log("Server Connected" ); } protected override void OnReciveMsg (GameMsg msg ) { Debug.Log("Server Rsp:" + msg.text); } protected override void OnDisConnected () { Debug.Log("Server DisConnected" ); } }
在Assets——Scripts——Service文件夹中新建NetSvc脚本:
1
2
3
4
5
6
7
8
9
10
11
12
13
14
15
16
17
18
19
20
21
22
23
24
25
26
27
28
29
30
31
32
33
34
35
36
37
38
39
40
41
42
using UnityEngine;using PENet;using PEProtocol;namespace DarknessWarGodLearning { public class NetSvc : MonoBehaviour { public static NetSvc Instance { get ; private set ; } PESocket<ClientSession,GameMsg> client = null ; public void InitSvc () { Instance = this ; client = new PESocket<ClientSession, GameMsg> (); client.SetLog(true , (msg, lv) => { switch (lv) { case 0 : msg = "Log:" + msg; Debug.Log(msg); break ; case 1 : msg = "Warn:" + msg; Debug.LogWarning(msg); break ; case 2 : msg = "Error:" + msg; Debug.LogError(msg); break ; case 3 : msg = "Info:" + msg; Debug.Log(msg); break ; } }); client.StartAsClient(SrvCfg.srvIP, SrvCfg.srvPort); } } }
在GameRoot中初始化Net服务
1 2 3 4 5 6 7 8 9 10 11 12 13 14 15 16 17 18 private void Init () { NetSvc netSvc = GetComponent<NetSvc>(); netSvc.InitSvc(); ResSvc resSvc = GetComponent<ResSvc>(); resSvc.InitSvc(); AudioSvc audioSvc = GetComponent<AudioSvc>(); audioSvc.InitSvc(); LoginSys loginSys = GetComponent<LoginSys>(); loginSys.InitSys(); loginSys.EnterLogin(); }
封装通用工具 如果我们想在客户端和服务端使用PETool.LogMsg,必须引用PENet命名空间,在这一节我们在PEProtocol里面用一个静态方法封装PETool.LogMsg,来减少麻烦。
我们在PEProtocol类库里面新建一个类,命名为PECommon
1
2
3
4
5
6
7
8
9
10
11
12
13
14
15
16
17
using PENet;public enum LogType{ Log = 0 , Warning = 1 , Error = 2 , Info = 3 } public class PECommon { public static void Log (string message = "" , LogType logType = LogType.Log { LogLevel lv = (LogLevel)logType; PETool.LogMsg(message, lv); } }
然后修改LoginSys
1
2
3
4
5
6
7
public class LoginSys : SingletonPattern <LoginSys >{ public void Init () { PECommon.Log("LoginSys Init Done" ); } }
修改NetSvc
1
2
3
4
5
6
7
8
9
10
11
12
using PENet;using PEProtocol;public class NetSvc : SingletonPattern <NetSvc >{ public void Init () { PESocket<ServerSession, GameMsg> server = new PESocket<ServerSession, GameMsg>(); server.StartAsServer(SrvCfg.srvIP, SrvCfg.srvPort); PECommon.Log("NetSvc Init Done" ); } }
修改ServerSession
1
2
3
4
5
6
7
8
9
10
11
12
13
14
15
16
17
18
19
20
21
22
23
24
25
using PENet;using PEProtocol;public class ServerSession : PESession <GameMsg >{ protected override void OnConnected () { PECommon.Log("Client Connected" ); SendMsg(new GameMsg { text = "Welcom to connect" }); } protected override void OnReciveMsg (GameMsg msg ) { PECommon.Log("Client Req:" + msg.text); SendMsg(new GameMsg { text = "SrvRsp:" + msg.text, }); } protected override void OnDisConnected () { PECommon.Log("Client DisConnected" ); } }
修改Unity客户端ResSvc
1 2 3 4 5 6 7 8 9 10 11 12 private void InitRDNameCfg (){ TextAsset rdNameCfgText = Resources.Load<TextAsset>(PathDefine.RDNameCfgPath); if (rdNameCfgText != null ) { }else { PECommon.Log("xml file:" + PathDefine.RDNameCfgPath + "nor exist" ,LogType.Error); }
修改ClinetSession
1
2
3
4
5
6
7
8
9
10
11
12
13
14
15
16
17
18
using PENet;using PEProtocol;public class ClientSession :PESession <GameMsg >{ protected override void OnConnected () { PECommon.Log("Server Connected" ); } protected override void OnReciveMsg (GameMsg msg ) { PECommon.Log("Server Rsp:" + msg.text); } protected override void OnDisConnected () { PECommon.Log("Server DisConnected" ); } }
服务器执行逻辑梳理 服务器从ServerStart入口启动初始化ServerRoot,并且设有while死循环,这个循环用来驱动NetSvc的消息队列处理。
ServerRoot用来初始化数据库层、服务层和业务系统层
服务器和客户端都根据cmd来分发消息,每个要发送和接受的message都有一个cmd值和err值,这两个值都在GameMsg类中用一系列枚举值来定义
服务器端的分发(此方法在Update调用):
1
2
3
4
5
6
7
8
9
10
11
12
private void HandOutMsg (MsgPack msgPack ){ switch ((CMD)msgPack.msg.cmd) { case CMD.ReqLogin: LoginSys.Instance.ReqLogin(msgPack); break ; case CMD.ReqRename: LoginSys.Instance.ReqRename(msgPack); break ; } }
客户端的分发(此方法在Update调用):
1
2
3
4
5
6
7
8
9
10
11
12
13
14
15
16
17
18
19
20
21
22
23
24
25
26
27
28
29
private void ProcessMsg (GameMsg msg ){ if (msg.err != (int )ErrorCode.None) { switch ((ErrorCode)msg.err) { case ErrorCode.AcctIsOnline: GameRoot.AddTips("Your Account is already online" ); break ; case ErrorCode.WrongPass: GameRoot.AddTips("Your Password is wrong" ); break ; case ErrorCode.UpdateDBError: PECommon.Log("数据库更新异常" ,LogType.Error); GameRoot.AddTips("Network instablilty" ); break ; } } switch ((CMD)msg.cmd) { case CMD.RspLogin: LoginSys.Instance.RspLogin(msg); break ; case CMD.RspRename: LoginSys.Instance.RspRename(msg); break ; } }
服务器和客户端都根据cmd值来决定此消息的处理模块。
Login System逻辑梳理 客户端的LoginWnd直接调用NetSvc来发送一个GameMsg,并指定cmd为ReqLogin,还有一个包装好的ReqLogin类,里面包含账号和密码数据。
服务端获取到客户端发来的GameMsg,根据cmd分发给LoginSys.ReqLogin(msg)来处理。
服务端LoginSys.ReqLogin(msg)内先生成一个GameMsg,指定cmd为RspLogin,先纠错:
判断当前账号是否已经上线:如果已经上线,指定err为AcctIsOnline,返回消息给客户端;
如果没有上线:
调用cacheSvc,cacheSvc再调用DBMgr,尝试从数据库中获取账号数据。
如果返回的账号数据为null,说明用户密码输入错误,指定err为WrongPass,返回消息给客户端。
如果返回了账号数据,新建一个包装好的RspLogin类,并将此账号数据在cacheSvc中缓存,返回消息给客户端。
客户端的NetSvc获取到服务端发来的GameMsg,先根据err值来报告错误,如果没有则根据cmd来分发消息,具体逻辑如上面的代码所示