项目地址
National-fighter-jets: 全民飞机大战 (gitee.com)
框架基于Manager of Managers
资源格式规范工具
资源导入 | ATAO2017,阿宅创造奇迹! (atao-blast.github.io)
用做UI的Sprite,导入选项中不要勾选“Enable Read/Write”和“Generate Mip Maps”,前者增大内存,后者会导致图片打包后模糊。
1
2
3
4
5
6
7
8
9
10
| using UnityEditor;
public class TextureImportSetting : AssetPostprocessor
{
private void OnPreprocessTexture()
{
TextureImporter importer = assetImporter as TextureImporter;
importer.textureType = TextureImporterType.Sprite;
}
}
|
拼UI摘要
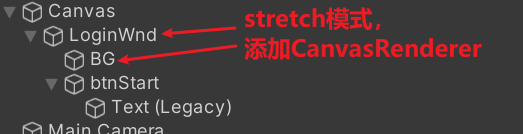
LoginWnd是个空对象,也要添加CanvasRenderer
饿汉模式Mono单例
1
2
3
4
5
6
7
8
9
10
11
12
13
14
15
16
17
18
19
20
21
22
23
24
25
26
27
28
29
30
31
32
| using UnityEngine;
public class MonoSingleton<T> : MonoBehaviour where T : MonoBehaviour
{
private static T instance;
public static T Instance
{
get
{
if (instance == null)
{
instance = FindObjectOfType<T>();
if(instance == null )
{
Debug.LogError("场景中未找到类的对象,类名为:" + typeof(T).Name);
}
}
return instance;
}
}
private void Awake()
{
if (instance == null)
{
DontDestroyOnLoad(gameObject);
}
else
{
Destroy(gameObject);
}
}
}
|
通过接口编程
在项目的早期阶段,如果预测到某些模块后期可能会修改实现,就应该设计接口,使用接口调用实现。
实例化UI时一定要指定好父物体,否则UI的Transform会出现很多问题。
先设计ILoader接口,也可以先实现再设计接口
1
2
3
4
5
6
| using UnityEngine;
public interface ILoader
{
public GameObject LoadPrefab(string path, Transform parent = null);
}
|
ResourceLoader实现,基于Resources文件夹加载
1
2
3
4
5
6
7
8
9
10
11
| using UnityEngine;
public class ResourceLoader : ILoader
{
public GameObject LoadPrefab(string path,Transform parent = null)
{
GameObject prefab = Resources.Load<GameObject>(path);
GameObject temp = Object.Instantiate(prefab,parent);
return temp;
}
}
|
Instantiate方法除了在MonoBehaviour内部调用,还可以使用UnityEngine.Object.Instantiate静态调用
ABLoader举例
1
2
3
4
5
6
7
8
9
| using UnityEngine;
public class ABLoader : ILoader
{
public GameObject LoadPrefab(string path, Transform parent = null)
{
throw new System.NotImplementedException();
}
}
|
LoadMgr针对接口公共开放
1
2
3
4
5
6
7
8
9
10
11
12
13
14
| using UnityEngine;
public class LoadMgr : NormalSingleton<LoadMgr>, ILoader
{
private ILoader m_Loader;
public LoadMgr()
{
m_Loader = new ResourceLoader();
}
public GameObject LoadPrefab(string path,Transform parent = null)
{
return m_Loader.LoadPrefab(path,parent);
}
}
|
动态挂载脚本
动态挂载是为了能够热更新。方法有:
- 保存脚本和预制体的关系,使用一个Config,保存一个Prefab的名字和对应脚本类名(一般就是View)的关系。
- 直接让Prefab的名称和对应脚本同名,通过Prefab的名称反射到脚本的Type,从而创建实例挂载脚本。
- 使用自定义特性,更方便地动态挂载脚本。
方法2的实现举例
开始菜单的预制体为“StartView”,创建一个同名脚本,再在LoagMgr加载预制体时,动态挂载同名脚本
1
2
3
4
5
6
7
8
9
10
11
12
13
| public GameObject LoadPrefab(string path,Transform parent = null)
{
GameObject temp = m_Loader.LoadPrefab(path,parent);
if (temp != null)
{
System.Type type = System.Type.GetType(temp.name.Remove(temp.name.Length - 7));
if (type != null)
{
temp.AddComponent(type);
}
}
return temp;
}
|
AddComponent有一个非泛型调用,直接传入Type即可。
在游戏的入口GameRoot中测试一下:
1
2
3
4
5
6
7
8
| public class GameRoot : MonoBehaviour
{
public GameObject canvas;
private void Start()
{
LoadMgr.Instance.LoadPrefab("Prefab/StartView",canvas.transform);
}
}
|
使用特性动态挂载
特性的使用意义:
- 标注字段、方法和类等,给获取它们的信息或者给予它们一些操作和信息。
- IDE的提示,比如Obsolete特性
特性的声明:
在Scripts文件夹内新建Attributes文件夹,在其中新建BindPrefabAttribute文件,这个特性用于给一个Mono类提供对应的Prefab路径信息。
1
2
3
4
5
6
7
8
9
10
11
| using System;
[AttributeUsage(AttributeTargets.Class)]
public sealed class BindPrefabAttribute : Attribute
{
public string Path { get;private set; }
public BindPrefabAttribute(string path)
{
Path = path;
}
}
|
特性的使用:
修改StartView,应用上特性
1
2
3
4
| using UnityEngine;
[BindPrefab("Prefab/StartView")]
public class StartView : MonoBehaviour{}
|
让特性起作用:
特性需要反射出来才能起作用,我们在Attributes文件夹内新建InitCustomAttributes,这个类用来反射出所有应用了对应特性的Type。
这个类在最开始初始化,获取到所有的绑定信息,并缓存入BindUtil中
1
2
3
4
5
6
7
8
9
10
11
12
13
14
15
16
17
18
19
20
21
| using System.Reflection;
using System;
public class InitCustomAttributes
{
public void Init()
{
Assembly assembly = Assembly.GetAssembly(typeof(BindPrefabAttribute));
Type[] types = assembly.GetExportedTypes();
foreach (Type t in types)
{
foreach (Attribute attr in Attribute.GetCustomAttributes(t,true))
{
if (attr is BindPrefabAttribute)
{
BindPrefabAttribute data = (BindPrefabAttribute)attr;
}
}
}
}
}
|
在Scripts——Utility文件夹内新建BindUtil,这个类用来缓存所有动态绑定的脚本type和对应的Prefab路径
1
2
3
4
5
6
7
8
9
10
11
12
13
14
15
16
17
18
19
20
21
22
23
24
25
26
27
28
29
30
31
32
| using System.Collections.Generic;
using UnityEngine;
using System;
public class BindUtil
{
private static Dictionary<string, Type> m_PrefabAndScriptMap = new Dictionary<string, Type>();
public static void Bind(string path, Type type)
{
if (!m_PrefabAndScriptMap.ContainsKey(path))
{
m_PrefabAndScriptMap.Add(path, type);
}
else
{
Debug.LogError("此Prefab使用了已经被使用的Script:" + path);
}
}
public static Type GetPrefabType(string path)
{
Type type;
if (m_PrefabAndScriptMap.TryGetValue(path, out type))
{
return type;
}
else
{
Debug.LogError("当前Prefab并没有被指定到具体的Script" + path);
return null;
}
}
}
|
特性实现举例
修改LoadMgr
1
2
3
4
5
6
7
8
9
10
11
12
13
| public GameObject LoadPrefab(string path,Transform parent = null)
{
GameObject temp = m_Loader.LoadPrefab(path,parent);
if (temp != null)
{
System.Type type = BindUtil.GetPrefabType(path);
if (type != null)
{
temp.AddComponent(type);
}
}
return temp;
}
|
仅作示例,动态绑定并不是在LoadMgr里面实现的,而是在UIMgr里面实现的,在后面会实现UIMgr,测试完后要改回去
修改GameRoot
1
2
3
4
5
6
7
8
9
10
11
12
| using UnityEngine;
public class GameRoot : MonoBehaviour
{
public GameObject canvas;
private void Start()
{
InitCustomAttributes initCustomAttributes = new InitCustomAttributes();
initCustomAttributes.Init();
LoadMgr.Instance.LoadPrefab("Prefab/StartView",canvas.transform);
}
}
|
Const
Scripts——Const文件夹,新建Path文件,用于设定各种路径。
1
2
3
4
5
| public class Path
{
private const string PREFAB_FOLDER = "Prefab/";
public const string START_VIEW = PREFAB_FOLDER + "StartView";
}
|
用到路径的地方自行替换即可,这里略


